Have you ever wondered how to remove engine sludge before it causes expensive damage to your vehicle? That thick, tar-like buildup inside your engine is silently choking oil passages, starving components of lubrication, and shortening your engine's lifespan. The good news: with the right approach, you can flush out sludge and restore proper oil flow without tearing your engine apart. Whether you're dealing with early-stage deposits or a severe case, this guide walks you through proven methods that work — from simple chemical flushes to more aggressive techniques reserved for neglected engines. Proper car care starts under the hood, and tackling sludge is one of the most impactful things you can do for engine longevity.

Engine sludge forms when oil breaks down due to heat, contamination, and extended drain intervals. The resulting gel-like substance clings to valve covers, oil pans, and pickup screens. Left unchecked, it restricts oil flow so severely that bearings, camshafts, and piston rings suffer accelerated wear. Some engines are more prone to sludge than others — turbocharged vehicles and those running conventional oil with long intervals top the list.
The severity of your sludge problem dictates the approach. A light coating responds well to chemical flushes you can do in your driveway. Heavy buildup may require multiple treatments or even manual cleaning. Let's break down exactly what to do based on your situation.
Contents
Quick Methods to Flush Engine Sludge
When sludge is mild to moderate, you don't need to pull the valve cover or drop the oil pan. Chemical and mechanical flushing methods handle most cases effectively from the comfort of your garage.
Chemical Engine Flush Products
Chemical engine flushes are the most accessible way to remove engine sludge for the average car owner. These products contain detergents and solvents that dissolve deposits and suspend them in the oil for removal during a drain.
Here's how to use them properly:
- Warm your engine to operating temperature (this thins the oil and softens deposits)
- Pour the flush product into your oil filler cap
- Idle the engine for 10–15 minutes — never drive or rev during this period
- Drain the oil immediately while it's still warm
- Replace the oil filter with a fresh one — the old filter will be loaded with dissolved sludge
- Refill with fresh oil to the correct level
Popular flush products include Liqui Moly Engine Flush, Sea Foam Motor Treatment, and BG EPR. They range from mild (Sea Foam, safe for regular use) to aggressive (dedicated flush chemicals for one-time severe cleanup). Match the product strength to your sludge severity.
Short-Interval Oil Changes
If you're uncomfortable with chemical flushes, repeated short-interval oil changes achieve the same result — just slower. Change your oil and filter every 1,500–2,000 miles for three consecutive cycles. Each change carries away dissolved contaminants. The fresh detergent additives in new oil continue loosening deposits between changes.
This method is gentler on seals and gaskets. It's ideal for high-mileage engines where aggressive solvents might expose worn seals. The tradeoff is time and cost — three oil changes versus one flush treatment. If you're deciding between using an oil extractor or drain plug for these frequent changes, both work fine, but the drain plug ensures you catch any heavy sludge settled at the bottom of the pan.
Basic Flush vs. Deep Cleaning
Not all sludge problems are equal. Understanding where your engine falls on the severity scale determines whether you're looking at a 30-minute job or a weekend project.
When a Basic Flush Is Enough
A chemical flush or short-interval oil change strategy works when:
- Oil pressure readings are still within normal range
- You see light discoloration or thin film under the oil cap — not chunky deposits
- The engine runs smoothly with no unusual noises
- Oil drain produces dark but free-flowing oil (not thick or gritty)
If your dipstick shows oil that's dark but still translucent when smeared on a white paper towel, a basic flush should restore things nicely.
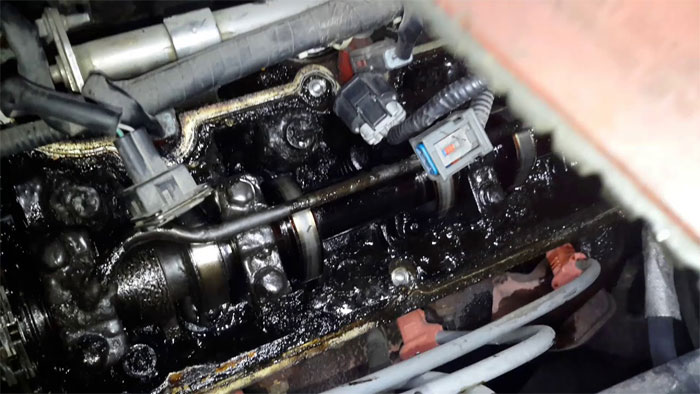
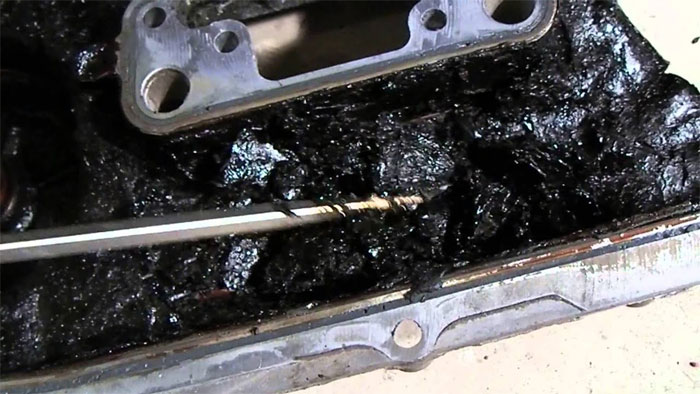
When You Need Manual Removal
Heavy sludge demands hands-on work. You'll know it's time for manual cleaning when you remove the oil cap and see thick, paste-like deposits on the underside of the valve cover, or when your oil pressure gauge consistently reads low.
Manual sludge removal involves:
- Remove the valve cover(s) and oil pan — you'll need to put the car on jack stands for pan access
- Scrape heavy deposits from accessible surfaces using plastic scrapers (never metal against aluminum)
- Flush passages with diesel fuel or kerosene and a parts brush
- Clean the oil pickup screen — this is often the most clogged component
- Inspect the timing chain area for buildup restricting the tensioner
- Reassemble with new gaskets, fresh oil, and a new filter
This process takes 4–8 hours depending on engine accessibility. It's the nuclear option, but for severely sludged engines, nothing else reaches the deposits hiding in galleries and behind timing covers.
Pro tip: Before reassembling, pour clean oil through the oil galleries from the top and verify it flows freely from the bottom. If it doesn't, sludge is still blocking internal passages and you need to continue cleaning.
Preventing Future Sludge Buildup
Removing sludge solves the immediate problem. Preventing it from returning is the real win. Engine sludge prevention comes down to two factors: oil quality and change discipline.
Choosing the Right Oil
Your oil choice is the single biggest factor in sludge prevention. Here's how different oil types compare:
| Oil Type | Sludge Resistance | Ideal Use Case | Change Interval |
|---|---|---|---|
| Conventional | Low | Low-mileage, mild conditions | 3,000–5,000 miles |
| Synthetic Blend | Moderate | Mixed driving, moderate heat | 5,000–7,500 miles |
| Full Synthetic | High | Turbo engines, extreme temps | 7,500–10,000 miles |
| High-Mileage Synthetic | High | Engines over 75k miles | 7,500–10,000 miles |
Full synthetic oils resist thermal breakdown far better than conventional oils. They maintain their viscosity and detergent properties longer, which means less opportunity for sludge-forming deposits to accumulate. If your engine has a history of sludge, switching to full synthetic is non-negotiable.
The relationship between your oil and your oil filter versus fuel filter matters too. A quality oil filter traps the microscopic particles that seed sludge formation. Cheap filters with low media surface area let contaminants circulate, accelerating breakdown.
Setting the Right Change Interval
Manufacturer-recommended intervals assume ideal conditions. Your actual driving conditions may demand shorter intervals:
- Severe conditions (short trips under 10 miles, dusty environments, towing, extreme heat): cut the recommended interval by 30–40%
- Turbocharged engines: oil temperatures run higher, degrading oil faster — lean toward the shorter end of the spec
- Older engines with existing wear: blow-by introduces combustion gases into the crankcase, contaminating oil faster
Track your oil changes by mileage AND time. Oil sitting in an engine degrades even without miles. If you drive infrequently, change it at least every six months regardless of mileage.
Common Engine Sludge Myths
Misinformation about engine sludge leads people to make poor maintenance decisions. Let's clear up the most persistent myths.
Myth: Synthetic Oil Causes Sludge or Leaks
This myth originated decades ago when early synthetic formulations used ester bases that could shrink certain seal materials. Modern synthetic oils are fully compatible with all engine seals and gaskets. In fact, synthetic oil prevents sludge far more effectively than conventional oil because it resists thermal and oxidative breakdown.
If you notice leaks after switching to synthetic, the oil didn't cause them. It cleaned away deposits that were masking an existing seal failure. The leak was already there — sludge was just acting as an accidental gasket. According to the U.S. Department of Energy, synthetic lubricants offer superior protection across temperature extremes compared to conventional petroleum-based oils.
Myth: Engine Flushes Always Damage Seals
The concern isn't unfounded — it's just overstated. Aggressive solvent-based flushes used improperly (running the engine under load, leaving the flush in too long) can indeed cause issues. But reputable flush products used according to directions are safe for engines in reasonable condition.
The real risk is this: if your engine has 200,000 miles and has never been flushed, removing all that sludge at once may expose worn seals and gaskets that sludge was inadvertently sealing. This isn't the flush "damaging" seals — it's revealing pre-existing wear. For these cases, the short-interval oil change method is safer because it removes deposits gradually.
Other myths worth dismissing quickly:
- "Thicker oil prevents sludge" — Wrong. Thicker oil just masks symptoms by maintaining pressure despite restricted passages. Use the viscosity your manufacturer specifies.
- "You can't fix sludge without an engine rebuild" — Only true in extreme cases where sludge has caused mechanical damage to bearings or journals.
- "New cars don't get sludge" — Any engine running conventional oil with extended intervals can develop sludge within 30,000–50,000 miles.
Diagnosing and Fixing Sludge-Related Problems
Knowing how to remove engine sludge is only half the battle. You also need to recognize when sludge is causing specific symptoms — and what to check after a flush if problems persist.
Recognizing the Warning Signs
Engine sludge rarely announces itself with a single obvious symptom. Instead, it creates a cluster of gradually worsening issues:
- Low oil pressure light or gauge reading — sludge blocking the pickup screen or galleries restricts flow
- Ticking or tapping from the valve train — starved lifters and cam followers make noise
- Oil consumption increasing without visible leaks — sludge on piston rings prevents proper oil scraping
- Dark, thick deposits visible under the oil cap or on the dipstick
- Check engine light with codes related to variable valve timing (VVT systems rely on clean oil passages)
- Rough idle or reduced power — VVT and variable displacement systems malfunction when oil flow is restricted
If you're dealing with an over-tightened drain plug while trying to inspect your oil, check our guide on removing an over-tightened oil plug before you strip anything.
What to Do After Flushing
You've flushed the engine and refilled with fresh oil. Now what? Monitor these items over the next 500–1,000 miles:
- Check oil level daily for the first week. Freed deposits can temporarily increase oil consumption as rings re-seat in cleaner bores.
- Watch for leaks. Inspect under the vehicle after overnight parking. Newly exposed gasket imperfections may seep.
- Listen for noise changes. Valve train ticking should decrease. If it gets worse, the oil pickup screen may still be partially blocked.
- Change oil again at 1,000–1,500 miles. The first fill after a flush picks up residual dissolved deposits. A quick follow-up change ensures clean oil is circulating.
If oil pressure remains low or noises persist after a thorough flush, the sludge may have caused mechanical wear that cleaning alone can't fix. At that point, you're looking at further diagnosis — potentially dropping the pan to inspect bearings or performing a compression test to assess ring condition.

Frequently Asked Questions
How long does it take to remove engine sludge with a chemical flush?
A single chemical flush treatment takes about 30 minutes — 10-15 minutes of idling with the product, plus the time to drain and refill. However, severe sludge may require two or three flush-and-change cycles spaced 1,000 miles apart to fully clear deposits from oil galleries and the pickup screen.
Can engine sludge cause permanent damage?
Yes. If sludge restricts oil flow long enough, it causes accelerated wear on bearings, camshafts, and piston rings. Once metal surfaces are scored or bearings are spun, no amount of cleaning reverses that damage. Early intervention is critical — the longer you wait, the higher the risk of irreversible engine wear.
Is it safe to use engine flush on a high-mileage vehicle?
It depends on the vehicle's maintenance history. If the engine has been regularly maintained and you're addressing light sludge, a mild flush product is safe. For neglected high-mileage engines that have never been flushed, use the short-interval oil change method instead. Removing large amounts of sludge suddenly can expose worn seals that were being masked by deposits.
What causes engine sludge to form in the first place?
Engine sludge forms through oil oxidation — heat and combustion byproducts break down oil molecules, creating thick polymeric deposits. The primary causes are extended oil change intervals, using conventional oil in high-heat applications, frequent short trips that prevent the engine from reaching full operating temperature, and coolant leaks that contaminate oil with moisture.
Next Steps
- Inspect your oil cap and dipstick today. Pull the oil filler cap and check the underside for sludge deposits. Smear dipstick oil on a white paper towel — if it's opaque black and gritty, you have a sludge problem that needs addressing now.
- Choose your removal method based on severity. Light film or discoloration: use a chemical flush at your next oil change. Thick paste-like deposits: commit to three short-interval oil changes at 1,500-mile increments. Chunky buildup with low oil pressure: plan a manual valve cover and oil pan cleaning.
- Switch to full synthetic oil on your next change. Regardless of current sludge status, full synthetic with the manufacturer-specified viscosity is your best long-term defense. Pair it with a quality filter rated for your change interval.
- Set a calendar reminder for your next oil change. Don't rely on memory or sticker estimates. Use your phone's calendar with a mileage note — track both miles and months, and change at whichever comes first.


About Chris Lewis
Chris Lewis developed a deep knowledge of automotive filtration, maintenance, and repair through years of hands-on experience working on vehicles — a passion rooted in time spent in his father's San Francisco auto shop from an early age. He has practical familiarity with air, oil, fuel, and cabin filter systems across a wide range of vehicle makes and models, along with experience evaluating the tools and equipment that serious DIY mechanics rely on. At MicrogreenFilter, he covers automotive and motorcycle filter reviews, maintenance guides, and automotive tool recommendations.
Get FREE Filters now. Or latest free tools from our best collections.
Disable Ad block to get all the secrets. Once done, hit any button below