Should you suck the oil out from the top or let gravity do the work from below? The oil extractor vs drain plug debate has split DIY mechanics for years, and the honest answer is that both methods work — but one might suit your situation far better than the other. Whether you're maintaining a daily driver or working on a weekend project in your garage, understanding the strengths and trade-offs of each approach helps you make smarter decisions about your car care routine. Let's break down the tools, costs, best practices, and common problems so you can pick the right method with confidence.
Both extraction and drain-plug methods remove used motor oil from your engine, but they approach the job from opposite directions — literally. An extractor pulls oil up through the dipstick tube using vacuum pressure, while the traditional drain plug relies on gravity to empty the pan from below. Each method has loyal fans, and each has real limitations worth understanding before you commit.
Your choice often depends on your vehicle, your workspace, and how much time you want to spend under (or over) the hood. Some cars make extraction dead simple, while others practically demand you get underneath with a wrench. Keep reading to see where each method shines and where it falls short.
Contents
Essential Tools for Each Method
Before you choose between an oil extractor vs drain plug method, you need to know what equipment each approach requires. The good news is neither method demands a professional-grade shop — but the tool lists look quite different.
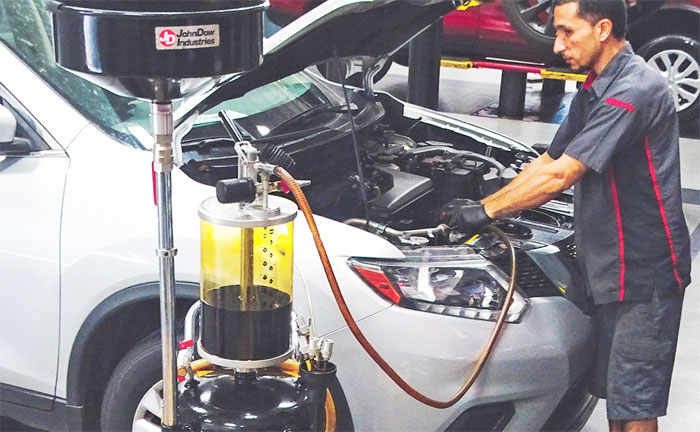
Oil Extractor Setup
An oil extractor is essentially a sealed canister connected to a tube that slides down the dipstick hole. You create vacuum pressure either by pumping a handle (manual extractors) or flipping a switch (electric/pneumatic models). The vacuum draws oil up through the tube and into the collection tank.
You'll need the extractor unit itself, the correct diameter extraction tube for your dipstick opening, and a container for disposing of the used oil. That's about it. No jack, no ramps, no crawling on concrete. Most manual extractors hold 6-8 quarts, which covers the majority of passenger vehicles in a single session.
Drain Plug Setup
The traditional method requires a socket wrench or box-end wrench sized for your drain plug, a drain pan, jack stands or ramps (for most vehicles), wheel chocks, and a new crush washer. You may also want a torque wrench to avoid over-tightening the plug on reinstallation.
Pro tip: Always replace the crush washer when you reinstall the drain plug. A worn washer is the most common cause of slow oil seepage that stains your driveway over weeks.
If you're already doing other undercarriage work — inspecting suspension components, checking for leaks, or examining brake lines — the drain plug method lets you combine tasks in a single session under the vehicle. Much like understanding how often to change your car oil filter, pairing related maintenance saves you time and keeps your vehicle running smoothly.
Choosing the Right Long-Term Approach
Picking an oil change method isn't just about today's job. You want something that works reliably for years without causing new problems. Here's how to think about the oil extractor vs drain plug decision as a long-term strategy.
Vehicle Design Considerations
Some vehicles practically beg for top-side extraction. Many BMWs, Volvos, and certain Audi models position the oil filter on top of the engine, meaning you never need to go underneath at all if you extract. Vehicles with skid plates or undertray panels that require removal before accessing the drain plug also favor extraction — it saves you ten minutes of wrestling with plastic clips every oil change.
On the other hand, trucks and SUVs with high ground clearance make drain-plug access trivial. If you can slide a drain pan under without jacking, the traditional method takes roughly the same time as extraction and gives you a visual check of the pan and plug condition.
Matching Method to Maintenance Schedule
If you change oil frequently (every 3,000-5,000 miles), extraction's speed advantage compounds over time. You'll save perhaps 15-20 minutes per change — that adds up across dozens of oil changes over a vehicle's life. For longer intervals with synthetic oil, the time savings per year are modest, and you might prefer the drain method's thoroughness since you're under there less often anyway.
Consider also that you should periodically use the drain plug method even if you primarily extract. This lets you inspect the drain plug threads, check for metal shavings in the pan (an early warning sign of internal wear), and verify the plug gasket condition. Alternating methods every third or fourth change gives you the best of both worlds.
Cost Comparison Breakdown
Money matters, especially for routine maintenance you'll repeat dozens of times. Here's how the numbers stack up for a typical DIY oil changer.
Upfront Investment
| Item | Oil Extractor Method | Drain Plug Method |
|---|---|---|
| Primary tool | $40–$120 (manual extractor) | $15–$30 (wrench set) |
| Vehicle lift equipment | Not required | $40–$80 (ramps or jack + stands) |
| Drain pan | Not required | $10–$20 |
| Torque wrench | Not required | $25–$50 (optional but recommended) |
| Total startup cost | $40–$120 | $90–$180 |
Ongoing Expenses
Per-change costs are nearly identical. Both methods require the same oil and filter. The drain plug method adds a crush washer ($0.50–$2.00 each), while extractors occasionally need replacement tubing ($5–$10 every few years). Over a five-year ownership period with regular changes, ongoing costs differ by less than $20 total.
Where extraction can save real money is by eliminating the need for professional oil changes entirely. If you've been paying a shop $60-$90 per visit partly because you lack jack stands or a flat workspace, a $70 extractor pays for itself after a single DIY change. According to the Bureau of Labor Statistics, automotive maintenance costs have risen steadily, making the DIY approach increasingly attractive.

Best Practices for Clean Oil Changes
Regardless of which method you choose, certain fundamentals apply to every oil change. Following these practices ensures you get all the old oil out and protect your engine in the process.
Getting the Most from Extraction
Warm the engine first. Run it for 5-10 minutes to thin the oil — warm oil flows faster and carries more suspended contaminants with it. Insert the extraction tube slowly and feel for the bottom of the oil pan. You want the tube tip sitting at the lowest point of the pan to capture as much oil as possible.
Pump steadily until you hear the tube sucking air instead of oil. Then reposition the tube slightly — many oil pans have baffles or irregular shapes that trap small pockets of oil. A second pass at a different angle often pulls another quarter-quart that would otherwise remain behind.
Warning: Never force the extraction tube if it meets resistance in the dipstick channel. Some vehicles have curved or restricted passages that can trap or break tubing. Check your owner's manual for dipstick tube routing before your first extraction attempt.
Drain Plug Done Right
With the drain plug method, patience is your best friend. After removing the plug, let the oil drip for at least 10-15 minutes. The difference between a 2-minute drain and a 15-minute drain can be half a quart of old oil — that's contaminated oil mixing with your fresh fill if you rush it.
Clean the drain plug magnet (if equipped) before reinstalling. Those metal particles are normal engine wear, but inspecting them gives you data. Fine powder is typical; larger flakes or chunks warrant further investigation. This visual inspection is something extraction simply cannot offer you, and it's one reason many experienced mechanics keep the drain method in their rotation even if they prefer extracting most of the time. Keeping your vehicle's filtration system in good shape also matters — knowing how often to change your car air filter is another piece of the maintenance puzzle that protects your engine long-term.
Troubleshooting Common Problems
Both methods have their failure modes. Knowing what can go wrong — and how to fix it — keeps a routine oil change from becoming a frustrating ordeal.
Extractor Won't Pull Oil
If your extractor pumps but doesn't draw oil, check these issues in order:
- Cold oil — too viscous to travel up the tube efficiently. Warm the engine and try again.
- Tube not seated — the tip may be resting above the oil level or caught on a baffle. Reinsert slowly while feeling for the pan floor.
- Air leak — check all connections, hose clamps, and the canister seal. Even a small leak kills vacuum pressure.
- Wrong tube diameter — too thin and it takes forever; too thick and it won't fit the dipstick channel.
If you've checked everything and extraction still fails, your vehicle may simply have a dipstick tube geometry that doesn't accommodate extraction tubing. Some manufacturers intentionally design restricted pathways. In that case, the drain plug is your only practical option.
Drain Plug Leaks and Stripped Threads
A stripped drain plug is the nightmare scenario for the traditional method, and it almost always comes from over-torquing. Most drain plugs require only 20-30 ft-lbs — far less than many people assume. Use a torque wrench, especially on aluminum oil pans which are more vulnerable to thread damage than cast iron.
If you've already stripped the threads, you have a few repair options: an oversized drain plug, a thread repair kit (like a Helicoil), or in severe cases, pan replacement. This is one area where the extraction method genuinely eliminates risk — if you never touch the drain plug, you can never strip it. For vehicles with known soft-thread issues (many modern engines use aluminum pans), defaulting to extraction makes practical sense.
Minor seepage after an oil change usually points to a missing or damaged crush washer. Don't try to fix it by tightening further — remove the plug, inspect the washer, replace it if it's flattened or cracked, and reinstall to spec torque.

Key Takeaways
- Oil extraction is faster, cleaner, and eliminates the risk of stripped drain plug threads — ideal for vehicles with top-mounted filters or limited underside access.
- The drain plug method costs less to start, lets you visually inspect the pan and plug for wear particles, and remains the more thorough option when you want every last drop out.
- Alternating between both methods every few changes gives you extraction's convenience most of the time while preserving the drain method's diagnostic benefits periodically.
- Whichever method you choose, warming the oil first and taking your time are the two simplest ways to ensure a complete, clean oil change every time.


About Chris Lewis
Chris Lewis developed a deep knowledge of automotive filtration, maintenance, and repair through years of hands-on experience working on vehicles — a passion rooted in time spent in his father's San Francisco auto shop from an early age. He has practical familiarity with air, oil, fuel, and cabin filter systems across a wide range of vehicle makes and models, along with experience evaluating the tools and equipment that serious DIY mechanics rely on. At MicrogreenFilter, he covers automotive and motorcycle filter reviews, maintenance guides, and automotive tool recommendations.
Get FREE Filters now. Or latest free tools from our best collections.
Disable Ad block to get all the secrets. Once done, hit any button below