Has your sun visor ever flopped down mid-drive, blocking your view at the worst possible moment? If so, you already know how urgent it feels to learn how to fix a broken car visor — and the good news is that most repairs are simpler than they look. Whether your visor is loose, sagging, or won't stay in place, you can often handle it yourself with basic tools and a free afternoon. This guide walks you through everything, from diagnosing the issue to completing a lasting repair. For more hands-on guides like this one, explore our DIY maintenance section.
Sun visors are one of those components you never think about until they stop working. They block glare during sunrise and sunset drives, hold your parking badge or garage remote, and — in many vehicles — include a vanity mirror with built-in lighting. When something goes wrong, it's not just an inconvenience. A visor that hangs in your sightline or won't lock in position is a genuine distraction hazard. According to Wikipedia, sun visors are specifically designed to reduce glare and improve driver visibility — two things that matter enormously when you're navigating bright morning or late-afternoon roads.
The right fix depends on exactly what's broken. A drooping visor has a different root cause than one that snapped clean off its mount. This guide breaks down each scenario clearly so you can identify your problem and apply the right solution — whether that's a fifteen-minute tightening job or a full component replacement.
Contents
Diagnosing the Problem: Understanding Common Car Visor Failures
Before you reach for a screwdriver, it pays to know exactly what you're dealing with. Sun visors fail in a handful of predictable ways, and identifying the specific failure mode saves you time and money. Skip the diagnosis step and you risk buying the wrong parts or applying a fix that won't hold.
The Most Common Types of Visor Damage
Most visor problems stem from wear caused by daily use. Pivoting the visor dozens of times a week puts steady stress on the hinge mechanism, and over time something gives. Here are the failure types you're most likely to encounter:
- Loose or floppy hinge — The visor no longer holds its position and droops forward into your sightline. This is the most common issue, usually caused by a worn tension spring or friction washer inside the pivot joint.
- Snapped mounting rod — The metal rod that connects the visor body to the headliner has broken, causing the visor to hang at an odd angle or detach on one side.
- Broken or cracked casing — The outer fabric or hard-shell covering has split, torn, or warped. This is often caused by excessive heat exposure or physical impact.
- Stuck pivot — The visor won't rotate side to side. Corrosion or debris in the hinge mechanism is usually the culprit here.
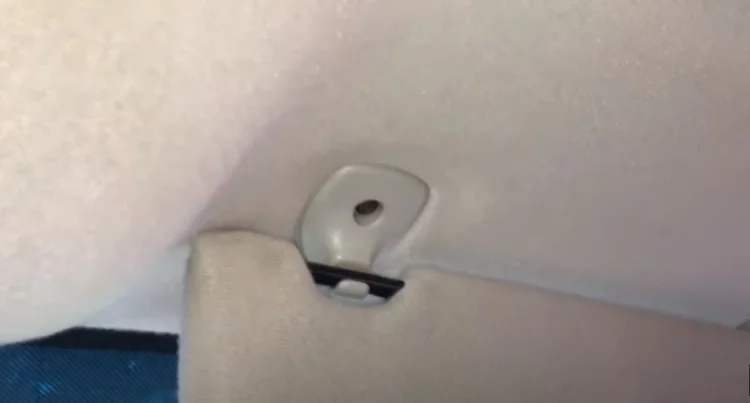
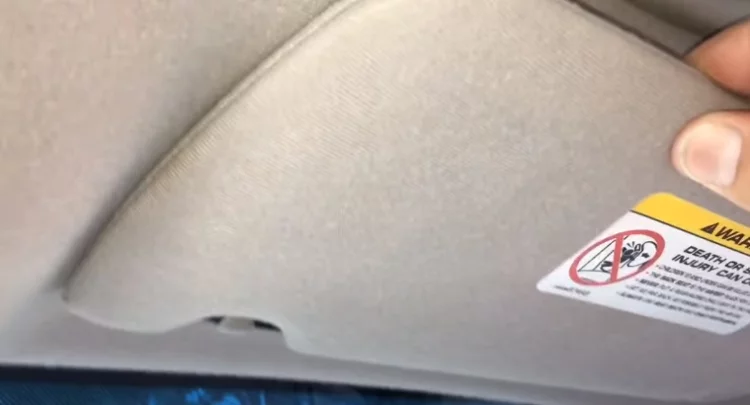
- Detached secondary clip — The clip that holds the visor flat against the windshield pillar has snapped or worn out, so the visor swings freely instead of locking in place.
Signs Your Visor Needs Immediate Attention
Some visor issues can wait a day or two. Others can't. If the visor is actively obstructing your field of vision — even partially — that's a priority repair. A drooping visor in bright sunlight is a distraction, and distracted driving is one of the most common contributors to road accidents.
- The visor falls forward into your line of sight while driving
- It won't lock in the up or down position
- The mounting rod is visibly cracked, bent, or partially separated
- The visor detaches from the headliner and hangs by a wire or one mounting point
- The secondary clip no longer snaps into place on the pillar
Safety tip: If your visor is drooping and you can't fix it right away, a binder clip or a length of hook-and-loop tape can hold it temporarily — but treat this as a short-term workaround only, not a permanent solution.
How to Fix a Broken Car Visor Yourself: Step-by-Step
Knowing how to fix a broken car visor comes down to matching the repair to the failure. Simple hinge problems are something most people can handle at home with tools they already own. More complex issues — like a snapped mounting rod or a damaged headliner attachment — require a bit more patience, but they're still well within reach for a capable DIYer.
Basic Fixes for Beginners
If your visor is floppy but otherwise intact, you're almost certainly dealing with a worn tension component inside the pivot mechanism. The fix is straightforward:
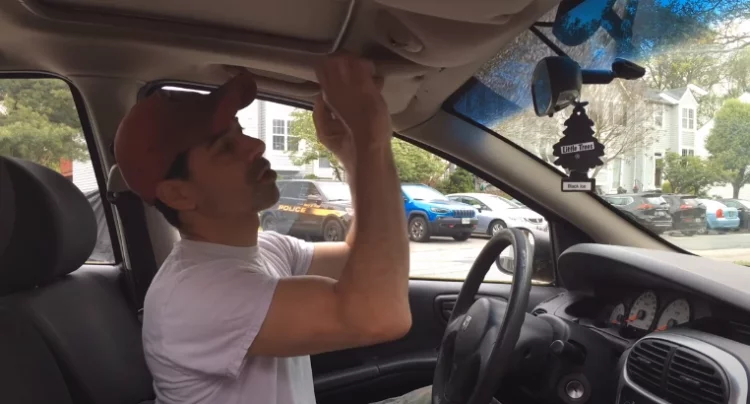
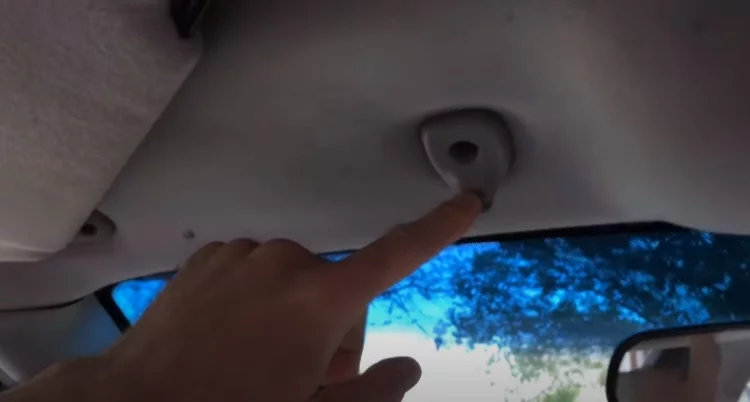
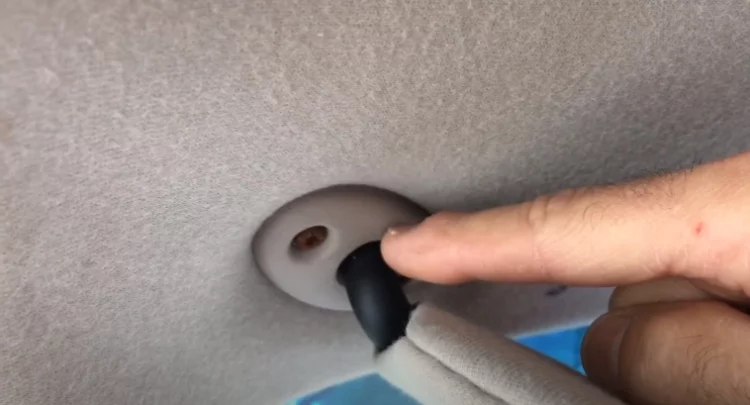
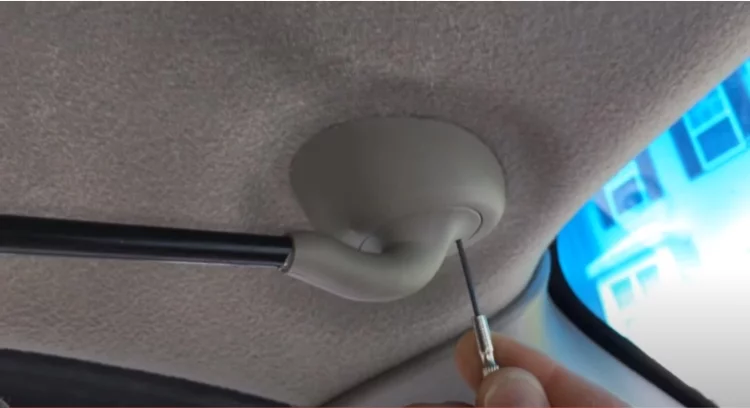
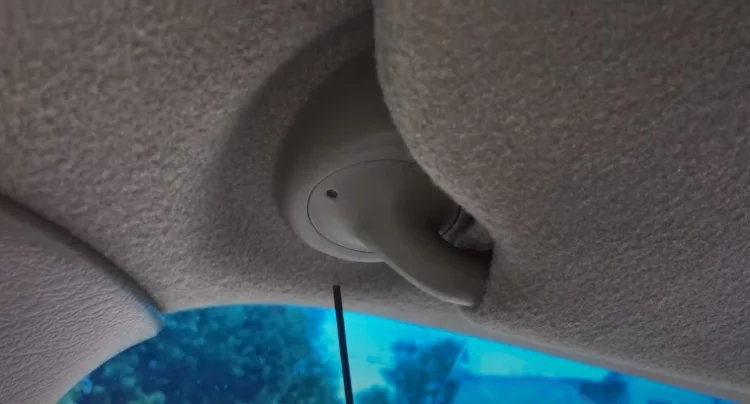
- Remove the visor — Look for two or three mounting screws at the points where the visor attaches to the headliner. A Phillips head screwdriver handles most of these. Some vehicles use plastic trim clips instead, which pop out with a trim removal tool.
- Access the pivot mechanism — With the visor off, locate the hinge joint where the body rotates around the mounting rod. The tension is usually maintained by a coil spring, a stack of friction washers, or a combination of both.
- Tighten or replace the worn component — If the spring is intact but stretched, try compressing it slightly with needle-nose pliers for a tighter grip. If it's broken or completely flat, replace it. Replacement springs cost $2–$8 at most auto parts stores and are worth having on hand.
- Reinstall and test — Reattach the visor, snug the screws down, and test the pivot resistance. It should hold any angle you set it to without drooping.
For a detached secondary clip, the fix is usually even simpler. The clip is typically a snap-fit plastic piece that you can replace without removing the entire visor assembly. Just order the correct clip for your vehicle and snap the new one into place.
Advanced Repairs for More Complex Damage
If the mounting rod has snapped or the headliner attachment point is damaged, the repair becomes more involved. Headliner work requires care — damage to the liner material is expensive to fix. It's worth knowing what that cost looks like before you start; our breakdown of headliner replacement costs gives you a clear picture of what's at stake if the repair goes sideways.
- Source the correct replacement rod — OEM rods are available through dealerships or salvage yards. Aftermarket options online are often less expensive and fit most common vehicle makes without modification.
- Remove the visor casing — Most visor covers use hidden perimeter clips. A plastic trim removal tool lets you pop them without cracking the casing. Once open, the internal structure — rod, spring, and bracket — is visible.
- Slide out the old rod — Note how it's routed through the visor body before removing it. Taking a quick photo helps you replicate the routing exactly when installing the new one.
- Install the new rod — Thread it through the same path, making sure both ends seat properly in their mounting brackets.
- Inspect the bracket while you're in there — If the bracket that anchors to the headliner is cracked or bent, replace it at the same time. Doing the job twice costs twice the effort.
Pro tip: Before ordering parts, search salvage yard databases for your vehicle's year, make, and model — a used OEM visor with all hardware already assembled typically runs $15–$30 and saves you from sourcing individual components separately.
DIY vs. Professional Repair: Comparing Your Options
Not every visor repair is a good candidate for DIY. Knowing when to handle it yourself — and when to hand it off — can prevent a minor fix from becoming a larger problem. Cost and skill level both factor into that decision.
When to Call a Pro
Some scenarios genuinely warrant professional help. If the mounting point in the headliner is pulling away from the roof structure, that requires more than basic hand tools. Similarly, if your visor has an integrated lighting circuit or a heated mirror, electrical work inside the unit needs careful handling to avoid creating a short. For a sense of how electrical repairs in your vehicle scale in cost, our article on tail light wiring repair costs provides useful context — similar complexity levels apply to visor electrical work.
The other case for professional repair: if you're simply not comfortable removing interior trim without cracking it. Headliner and pillar trim can be fragile, especially in older vehicles where the foam backing has dried out. A botched trim removal can cost more to fix than the original visor problem.
Cost Breakdown by Repair Type
| Repair Type | DIY Parts Cost | Professional Total Cost | Time Required | Skill Level |
|---|---|---|---|---|
| Tension spring replacement | $2–$8 | $40–$80 | 30–60 min | Beginner |
| Secondary clip replacement | $3–$10 | $30–$60 | 15–30 min | Beginner |
| Mounting rod replacement | $15–$40 | $80–$150 | 1–2 hours | Intermediate |
| Full OEM visor replacement | $30–$80 | $120–$250 | 1–2 hours | Intermediate |
| Headliner attachment point repair | $20–$60 | $150–$350 | 2–4 hours | Advanced |
| Integrated mirror or lighting circuit repair | Not recommended | $100–$300 | 1–3 hours | Professional |
The cost gap between DIY and professional repair is significant across every category. If you're comfortable with basic hand tools and have an hour or two free, most visor repairs make strong economic sense to handle yourself. The main exceptions are electrical circuits inside the visor unit and structural headliner attachment repairs. Those are better left to a pro unless you have experience with interior trim work. In the same way that you'd weigh the tradeoffs before deciding on how much window tinting to add for glare reduction, it's worth thinking through whether a DIY repair or a full replacement better fits your situation and budget.
Real Visor Fixes in Action: Scenarios and Solutions
Theory helps, but seeing how repairs play out in practice makes the process much clearer. Here are two of the most common visor failure scenarios and exactly what to do about each one.
The Sagging Visor Fix
You flip the visor down to block the sun, let go, and it slowly droops forward until it's blocking half your windshield. This is classic tension failure — the internal spring or friction washer that holds the pivot in position has worn flat.
- Unscrew the visor at its roof mounting points and bring it down to your workbench or lap.
- Locate the pivot joint — the rotating assembly where the visor body meets the mounting rod.
- If a friction washer is present and worn thin, replace it with a new one of matching diameter and thickness (available at hardware stores).
- If a coil spring is stretched out, either compress it slightly with pliers for a temporary tighter fit or swap it with a new spring.
- Reassemble, reinstall, and test the pivot tension. The visor should now hold any angle without drifting.
An alternative some people use: wrap a few layers of electrical tape around the pivot rod before reassembling. The added thickness increases friction and can restore holding power. It's not a permanent fix, but it buys you time while you source the proper replacement component.
The Snapped Rod Replacement
A snapped mounting rod typically causes the visor to hang at an odd angle or fully detach on one side. The visor may still be connected by a wire harness (for lit mirrors) even after the rod fails — so handle it carefully to avoid yanking the connector free.
- Order a replacement rod sized for your vehicle's year, make, and model. Rod diameter and length vary between vehicles, so check the part number before buying.
- Remove the visor's outer casing by popping the perimeter clips with a trim tool. Work slowly around the edge — don't force any section that feels stuck.
- Note how the old rod is routed through the internal structure, then slide it out. A photo taken before removal is worth the two seconds it takes.
- Insert the new rod along the same path, seating both ends securely in their respective brackets.
- Reassemble the casing, reinstall the visor, and verify that both mounting points are fully locked before testing.
Warning: Never try to repair a snapped metal rod with adhesive or zip ties — the joint won't hold under daily use, and a visor that falls unexpectedly while driving is a serious distraction hazard.
Keeping Your Sun Visor Working Long-Term
Fixing a broken visor is satisfying. Making sure it doesn't break again is even better. A few straightforward habits and preventive steps can significantly extend the life of your visor's internal components. The same mindset that keeps your visor working applies to other interior care tasks — just as cleaning and conditioning your leather car seats prevents cracking and wear before it starts, caring for your visor proactively avoids the damage that leads to repairs.
Habits That Extend Visor Life
How you handle the visor on a daily basis has a direct impact on how long the pivot mechanism and mounting hardware last. These habits are small but their effect compounds over time:
- Use smooth, deliberate movements — Jerking or forcing the visor into position puts unnecessary stress on the pivot and rod. A steady motion takes only a fraction of a second longer and reduces wear significantly.
- Don't overload the visor — Hanging heavy items like multi-card holders or thick lanyards from the visor creates constant downward pull on the pivot mechanism, accelerating tension loss.
- Park in shade when possible — Interior temperatures in a parked car can exceed 150°F on a hot day. Repeated heat cycles cause plastic components inside the visor to expand, contract, and gradually degrade.
- Inspect the secondary clip regularly — The clip that snaps onto the pillar takes repeated stress every time you fold the visor to the side. Check it every few months and replace it at the first sign of cracking.
Protective Measures Worth Taking
Beyond daily habits, a few proactive steps protect your visor and your driving comfort at the same time:
- Use a windshield sunshade when parked — A folding reflective sunshade dramatically reduces interior temperatures, which slows the heat-related degradation of visor components and dashboard materials alike.
- Evaluate your window tint — Good window tint reduces the glare your visor has to compensate for, which means less frequent use and less wear on the pivot. If you're regularly straining the visor against intense glare, it's worth reading about how much window tinting is appropriate for your situation.
- Keep the cabin dry — Excess moisture accelerates corrosion in the visor's metal pivot components. Good cabin ventilation — and a functioning cabin air filter replaced on schedule — helps manage interior humidity levels.
- Check after any interior or roof work — If you've had headliner repairs, sunroof sealing, or roof-related work done, verify that the visor mounting points weren't disturbed in the process before the warranty on that work expires.
The visor is a small part, but it connects to bigger concerns — your forward visibility, your interior condition, and your safety every time you drive into the sun. Treating it with the same attention you'd give other routine maintenance items keeps everything working together reliably.
Frequently Asked Questions
How much does it cost to fix a broken car visor?
Cost depends on the repair type. A simple tension spring replacement costs $2–$10 in parts if you do it yourself. A full OEM visor replacement runs $30–$80 for DIY or $120–$250 at a professional shop. Headliner mounting repairs are at the higher end and can reach $350 at a shop. Most people find the DIY route significantly more affordable for anything other than electrical repairs.
Can I drive with a broken sun visor?
It depends on the nature of the failure. If the visor is securely stored in the up position and not obstructing your sightline, you can usually drive short distances while you source parts. However, if it droops into your field of vision or has detached from the headliner, it's a distraction hazard and should be fixed before you drive.
How do I fix a sun visor that won't stay up?
A visor that won't hold position typically has a worn tension spring or friction washer inside the pivot joint. Remove the visor from its mounting points, locate the pivot mechanism, and replace the worn component. Wrapping the pivot rod with a few layers of electrical tape can temporarily restore friction if you can't get replacement parts right away.
Is sun visor repair covered under a car warranty?
In many cases, yes — if your vehicle is still under the manufacturer's bumper-to-bumper warranty and the failure is due to a manufacturing defect rather than normal wear or misuse. Check your warranty documentation and contact your dealership to confirm coverage before paying for repairs out of pocket.
Where can I buy replacement sun visor parts?
Auto parts retailers like AutoZone, O'Reilly, and Advance Auto stock common replacement springs and clips. For mounting rods or complete visor assemblies, dealerships and salvage yards are reliable sources. Online marketplaces often have aftermarket options at lower prices — just confirm fitment by checking your vehicle's year, make, and model before ordering.
How do I know if I need to replace the whole visor or just a part?
If the pivot mechanism is worn but the mounting rod and casing are intact, you can usually fix it with an inexpensive replacement spring or washer. If the rod is snapped, the casing is badly cracked, or the headliner attachment point is damaged, a full visor replacement is often more cost-effective and less time-consuming than tracking down individual components.
Can a broken visor be repaired with adhesive?
Adhesives work for minor cosmetic fixes — like reattaching a split fabric edge or a delaminated cover — but they're not suitable for structural repairs. A glued mounting rod or pivot joint won't hold up to the repeated stress of daily use. For any load-bearing repair, use proper replacement hardware sourced for your specific vehicle.
Next Steps
- Inspect your visor today — fold it up and down several times, check the pivot tension, and confirm the secondary clip snaps securely onto the pillar.
- Identify your exact failure mode from the list in this guide, then look up the correct replacement part number for your vehicle's year, make, and model before ordering anything.
- Gather your tools before starting — at minimum, a Phillips screwdriver, a plastic trim removal tool, and needle-nose pliers cover most repair scenarios.
- If your repair involves the headliner or any electrical components inside the visor, get at least one professional quote and weigh it against the DIY cost table above before deciding which route to take.
- Once the visor is fixed, spend a few minutes checking other interior maintenance items — including your cabin air filter, which is easy to overlook and has a direct impact on air quality and comfort every time you drive.


About Chris Lewis
Chris Lewis developed a deep knowledge of automotive filtration, maintenance, and repair through years of hands-on experience working on vehicles — a passion rooted in time spent in his father's San Francisco auto shop from an early age. He has practical familiarity with air, oil, fuel, and cabin filter systems across a wide range of vehicle makes and models, along with experience evaluating the tools and equipment that serious DIY mechanics rely on. At MicrogreenFilter, he covers automotive and motorcycle filter reviews, maintenance guides, and automotive tool recommendations.
Get FREE Filters now. Or latest free tools from our best collections.
Disable Ad block to get all the secrets. Once done, hit any button below