About 70% of accident victims say they wished they had dashcam footage to support their insurance claim. If that statistic surprises you, it shouldn't — in-car cameras are one of the fastest-growing automotive accessories on the market today. But before you buy, you need to get the dash cam vs mirror cam comparison right. These two devices look different, work differently, and suit different types of drivers. Making the wrong call means spending money on features you don't need — or missing the ones you do. For step-by-step install guides and car care how-tos, browse the DIY Maintenance section first.
A standard dash cam is a compact unit that mounts on your windshield or dashboard. It records what's ahead — and sometimes behind — using a second rear-facing camera. A mirror cam replaces or clips over your existing rearview mirror, turning it into a display and recorder at the same time. Both devices loop footage to an SD card. Both can protect you in a legal dispute. But that's roughly where the similarities end.
Your decision comes down to what you value most: discreet form factor, video resolution, rearview coverage, or ease of installation. This guide walks through every major factor so you can decide with confidence and buy right the first time.
Contents
- Understanding Dash Cams and Mirror Cams
- The Dash Cam vs Mirror Cam Comparison: Side by Side
- Which One Fits Your Experience Level?
- Cost Breakdown: What You'll Actually Spend
- Keeping Your Camera Running Long-Term
- Pro Tips to Get More from Your Camera
- Fixing Common Camera Problems
- Frequently Asked Questions
- Next Steps
Understanding Dash Cams and Mirror Cams
Before you start comparing specs, it helps to understand exactly what each device is designed to do. They solve the same core problem — recording your drive — but they approach it differently. Knowing those differences changes how you evaluate every spec on the box.
How a Standard Dash Cam Works
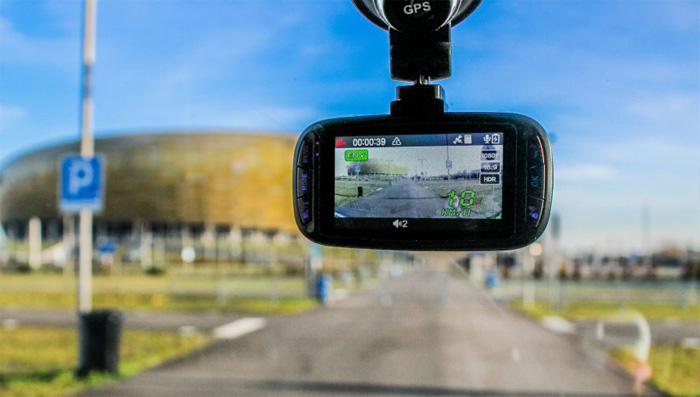
A dash cam is a dedicated, single-purpose recording device. You mount it on your windshield or dashboard — usually with a suction cup or adhesive bracket — and it runs automatically every time you start the car. Footage loops to an SD card continuously.
- Front-facing: records the road ahead at all times
- Dual-channel: adds an optional second camera for rear coverage
- Parking mode: continues recording when parked, triggered by motion or impact
- GPS logging: records speed and location data alongside every frame of video
Power comes from your 12V cigarette lighter port or, for a cleaner result, hardwired directly to your fuse box. Hardwiring is a low-voltage job, but it still involves your car's electrical system. Poor installs can cause downstream problems — see how much it can cost to fix tail light wiring for a real-world sense of what amateur electrical work sometimes leads to.
Dash cam resolution ranges from basic 1080p on budget models to true 4K on premium units. Higher-end models add Sony Starvis low-light sensors, ADAS lane departure warnings, and cloud connectivity.
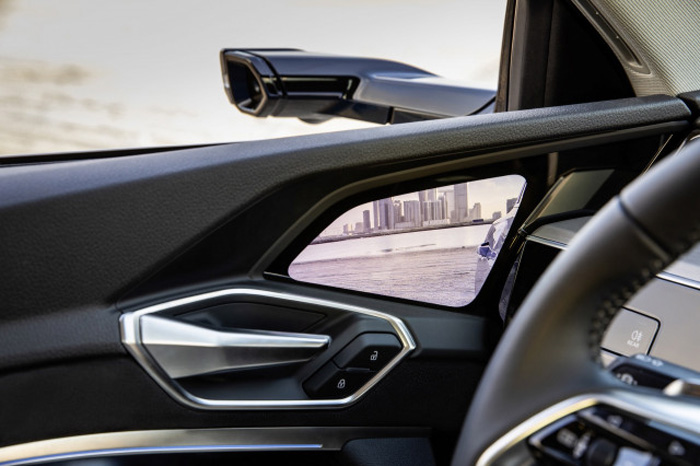
How a Mirror Cam Works
A mirror cam replaces your stock rearview mirror — or clips over it. The front surface becomes a touchscreen display. A forward-facing camera sits in the mirror housing. A second rear camera mounts near your license plate and feeds a wide-angle live view back to the display in real time.
- Eliminates the blind spot that cargo or rear passengers create in a stock mirror
- Wide-angle digital rear view replaces the physical reflection entirely
- Parking guidelines overlay the rear image for safer reversing
- Recording runs on the same loop-to-SD-card system as a dash cam
Power runs from the same 12V sources. The rear camera cable is the complex part — it typically runs along the headliner, down the A or C pillar, and under carpet to the rear of the car. If you're not comfortable with basic car electronics, brushing up on 12V power systems and car audio wiring before you start will save you hours of troubleshooting.
The Dash Cam vs Mirror Cam Comparison: Side by Side
This is the section that answers the core question. Here's how the two devices stack up across every factor that matters to most drivers making a real purchase decision.
Key Specs at a Glance
| Feature | Dash Cam | Mirror Cam |
|---|---|---|
| Typical Price Range | $30–$350+ | $60–$250+ |
| Installation Difficulty | Easy to Moderate | Moderate to Hard |
| Front Video Quality | 1080p–4K | 1080p–2.5K |
| Rear Coverage | Optional (dual-channel add-on) | Built-in as standard |
| Screen / Display | Small screen or smartphone app | Full mirror display |
| Discreetness | High — compact unit | Low — screen is always visible |
| Parking Mode | Common at mid and high tiers | Rare, limited support |
| GPS Built-In | Common at mid and high tiers | Rare |
| Low-Light Performance | Sony Starvis or equivalent | Varies widely by model |
| Cabin Clutter | Adds a visible unit to windshield | Replaces existing mirror cleanly |
What the Numbers Tell You
A few patterns jump out immediately from that table:
- Dash cams win on front video quality and feature depth at every price point
- Mirror cams win on rear coverage by default — no extra camera to buy or cable to run
- GPS logging is effectively a dash cam exclusive at any reasonable price
- Parking mode availability strongly favors dash cams
- Mirror cams produce a cleaner-looking cabin — no extra unit hanging from the glass
Neither device is objectively better. What you're really choosing is which tradeoff you can live with. Your priority — cleaner install vs. richer features vs. better rearview — decides the winner for your situation.
Which One Fits Your Experience Level?
Your comfort with car electronics and your tolerance for a complex install will shape which device actually works for you. Here's how to think about it honestly.
If You're New to In-Car Cameras
Start with a basic dash cam. The reasons are practical:
- Plug the power cable into your 12V port — no electrical knowledge required
- Attach the mount to the windshield, insert the SD card, and you're recording
- Plenty of solid models available under $80
- No rear camera cable to route through your headliner
- Easy to remove if you change your mind or switch vehicles
Most first-time users have a basic dash cam fully installed and recording in under 30 minutes. If something goes wrong, you can unplug it immediately and start over with zero damage to your car's wiring.
Pro tip: First-time installers should use the adhesive mount over a suction cup — adhesive holds more reliably through temperature swings and road vibration.
If You're a Tech-Savvy Driver
Mirror cams reward drivers who are comfortable running cables and spending an afternoon on a clean install. The payoff is real:
- The rear camera eliminates the blind spot your stock mirror creates when cargo fills the back seat or trunk
- The display replaces your mirror entirely — no extra device cluttering your windshield
- Parking guidelines overlaid on the rear image make reversing into tight spaces noticeably safer
If you've handled jobs like installing wheel locks for vehicle security or swapping out interior accessories, running a mirror cam's rear cable is a reasonable weekend project. Budget 2–4 hours for the rear camera cable run in most vehicles.
Premium dash cams with GPS, ADAS, and 4K front sensors also appeal to tech-savvy drivers. But even the most feature-loaded dash cam is simpler to install than a mirror cam with a full rear cable run.
Cost Breakdown: What You'll Actually Spend
The sticker price is not the whole story. Factor in accessories, storage cards, and installation before you lock in a budget.
Entry-Level Options
Functional dash cams start as low as $30–$50. At this price range, here's what you get:
- 1080p front recording with loop functionality
- Basic night vision — usable, not impressive
- No GPS, no parking mode, no Wi-Fi
- SD card sold separately — add $10–$20 for a 32–64GB high-endurance card
Entry-level mirror cams start around $60–$80. You'll get front and rear recording, a wide-angle display, and basic parking guidelines at this price. Build quality varies significantly — read user reviews carefully and pay attention to rear camera performance specifically, since that's where budget mirror cams often cut corners.
Mid-Range and Premium
This is where the real quality gap opens up between models:
- $100–$200 dash cam: 2K or 4K front sensor, GPS, Sony Starvis low-light, parking mode (requires a hardwire kit at ~$15–$25 extra)
- $100–$200 mirror cam: improved rear camera resolution, touch display, better night performance
- $200+ dash cam: 4K front plus 1080p rear, cloud connectivity, 24/7 parking surveillance with a second battery pack
- $200+ mirror cam: OEM-fit designs for specific vehicles, higher display resolution, cleaner integration
Professional installation adds cost. A hardwired dash cam typically runs $50–$150 at a shop. A mirror cam with a full rear cable run can run $100–$200. If you want to handle it yourself and save that money, the DIY Maintenance section has guides that walk through exactly this kind of job.
Real total cost for a solid mid-range setup:
- Dash cam: $130–$180 unit + $20 SD card + $20 hardwire kit = approximately $170–$220
- Mirror cam: $130–$200 unit + $20 SD card = approximately $150–$220
The price gap between the two is smaller than most people assume. You're choosing features and form factor — not one that's clearly cheaper than the other.
Keeping Your Camera Running Long-Term

An in-car camera is only useful if it's actually working when you need it. Both device types require regular attention to stay reliable. Neglect either one and you'll find corrupted footage — or no footage — at the worst possible moment.
Routine Care for Dash Cams
- Format the SD card monthly — do it in the camera, not on your computer, to avoid file system errors
- Wipe the lens with a microfiber cloth at every oil change — smudges cause major image degradation at night
- Check the mount every few weeks — heat and cold cycles loosen adhesive over time
- Inspect the cable run for pinch points — door jamb and A-pillar routing are the most common failure spots
- Update the firmware whenever the manufacturer releases it — updates fix bugs and often improve sensor performance
Keeping your camera lens clean is part of keeping your whole interior in good shape. If you're doing a full interior refresh, the guide on how to clean and condition leather car seats pairs well with a camera maintenance session.
Keeping a Mirror Cam in Shape
Mirror cams have a few extra maintenance points worth knowing:
- Clean the rear camera lens regularly — it's exposed to road grime, rain, and exhaust continuously
- Inspect the rear camera cable where it passes through the tailgate hinge — repeated open-and-close cycles fatigue the wire over time
- Wipe the display screen with a soft cloth — fingerprints and dust significantly reduce visibility at night
- Verify the mirror clip hasn't loosened — vibration from rough roads causes the clip mount to shift
- Recalibrate parking guidelines if the rear camera shifts position
Both device types benefit from the same mindset that applies to any car care task. A little consistent attention prevents bigger problems. Think of it the same way you'd approach the car polish vs wax decision — small regular effort extends the life of everything significantly.
Pro Tips to Get More from Your Camera
Buying the right device is step one. Getting consistently useful footage is step two. These tips apply regardless of which type you choose.
Smart Setup Habits
- Mount position matters: place your dash cam directly behind the rearview mirror — it minimizes driver obstruction and keeps you compliant with most state windshield obstruction laws
- Angle the camera slightly downward — you want license plates in the frame, not open sky
- For mirror cams, dial in the rear camera angle before you route the cable — adjusting after the fact is significantly harder
- Use a high-endurance SD card (Samsung PRO Endurance or SanDisk High Endurance specifically) — standard cards fail early under constant loop recording heat cycles
- Set the correct time, date, and time zone before your first drive — accurate timestamps are essential if footage is ever used as evidence
Getting Better Footage
- Enable GPS logging if your camera supports it — speed and location data add important context to video evidence
- Turn on parking mode if you regularly park in public lots or on busy streets — most theft and hit-and-run incidents happen while the car is unoccupied
- Download and back up footage immediately after any incident — loop recording will overwrite it within hours or days
- Test your footage quality at night in a parking lot before you rely on it — low-light performance varies dramatically between models at the same price
- Think of your camera as part of a broader security system. Pairing it with wheel locks gives you both a deterrent and evidence if prevention fails
Also consider your car's mechanical security holistically. A dash cam records what happens to your car. Understanding how your door locks and latches work as a system is part of the same security mindset.
Fixing Common Camera Problems
Even a well-installed camera will run into issues eventually. Most problems are fixable at home. Go through this list before you assume the hardware is defective.
Dash Cam Issues
- Camera won't power on: check the fuse in your 12V port first; if hardwired, verify the fuse tap at the fuse box hasn't blown
- Footage is corrupted or missing: format the SD card inside the camera — formatting via computer uses the wrong file system settings
- Video appears blurry or hazy: clean the lens; persistent haze may indicate moisture has entered between the glass layers
- Camera keeps restarting in a loop: almost always a failing SD card — replace it with a high-endurance model
- Nighttime footage is too dark: open the camera's menu and reduce the exposure compensation; enable HDR or WDR mode if available
- Timestamps are wrong: re-enter the time and date in the settings; GPS-enabled cameras usually sync automatically once they get a satellite lock
Electrical issues with your dash cam sometimes trace back to the broader 12V circuit it shares with other accessories. The diagnostic logic used to troubleshoot brake lights that work but tail lights that don't applies directly here — isolate the circuit, check grounds, test fuses.
Mirror Cam Issues
- Rear camera shows a black screen: inspect the cable connection at the rear camera and at the mirror unit — the tailgate connection is the most common failure point
- Display flickers or cuts out: usually a loose power connection at the mirror housing itself — reseat the connector
- Rear image is delayed, choppy, or pixelated: indicates a marginal rear cable — check for kinks, pinch points, or damage along the full run
- Mirror vibrates excessively: the clip mount has loosened over time — tighten it or add a thin foam pad behind the clip to dampen road noise transfer
- Parking guideline positions are off: access the camera settings to recalibrate the line positions — this is a software adjustment, not a hardware fix
According to Wikipedia's overview of dashcams, user error during initial installation accounts for the majority of early device failures across both categories. Slow down on the cable routing, double-check every connection before you close up the trim panels, and test the device fully before reassembling anything.
Frequently Asked Questions
Is a mirror cam better than a dash cam for parking surveillance?
No — dash cams have the advantage here. Most mirror cams have limited or no parking mode support. Mid-range and premium dash cams include motion-triggered and impact-triggered parking recording, especially when hardwired to a constant 12V source. If parking surveillance matters to you, prioritize a dash cam with confirmed parking mode compatibility and a hardwire kit.
Can a mirror cam completely replace my factory rearview mirror?
Yes, that's exactly how replacement-style mirror cams are designed to work. Clip-over models sit on top of your existing mirror, while replacement units remove the stock mirror entirely. The digital rear view from the license plate camera is typically wider and less obstructed than a physical mirror reflection, especially in SUVs and wagons where rear cargo blocks the standard mirror view.
Do I need professional installation for a basic dash cam?
No. A basic dash cam powered by the 12V port is a genuine DIY install — mount, plug in, and record. Hardwiring for a cleaner look and parking mode access is a slightly more involved job but still achievable for most home mechanics comfortable working around a fuse box. A mirror cam with a rear camera cable run is where professional installation starts to make real sense for first-timers.
What resolution do I actually need for insurance and legal purposes?
1080p is the minimum practical resolution for reading license plates at normal driving distances. 1440p or 2K gives you more confidence at higher speeds and in poor lighting. True 4K is useful if you want to zoom in digitally on footage after the fact without losing detail. For most drivers, a good 1080p camera with a quality Sony Starvis sensor outperforms a cheap 4K camera in real-world low-light conditions.
Can I run a dash cam and a mirror cam in the same vehicle at the same time?
Technically yes, but it's rarely practical. You'd be duplicating front recording, drawing more power, and adding installation complexity. A better approach is to choose one device and pair it with a dedicated rear camera if you need back coverage. Dual-channel dash cams handle front-and-rear recording cleanly without the complexity of running two separate systems.
How much SD card storage do I need for continuous recording?
A 64GB card handles roughly 8–10 hours of 1080p footage before looping back to overwrite the oldest files. For most daily commuters, 64GB provides 1–3 days of retained footage at any given time. If you want longer retention — or you're running dual-channel at higher resolution — step up to a 128GB or 256GB high-endurance card. Avoid standard consumer cards; they're not rated for the constant read-write cycles that loop recording demands.
Next Steps
- Decide your single most important priority — discreet front recording, built-in rearview coverage, or parking mode — and let that narrow your choice to one device type before you look at any specific models.
- Set a realistic total budget that includes the SD card, a hardwire kit if needed, and potential installation labor, not just the camera price tag.
- Search for video reviews of your top two or three candidates specifically filmed at night — nighttime performance is where budget cameras separate from quality ones and reviewers rarely emphasize it enough in text.
- Map your rear camera cable route in your actual vehicle before you buy a mirror cam — open the headliner edge, check the tailgate hinge path, and confirm the run is feasible with your interior trim.
- After installation, test your setup by driving at night and reviewing the footage the same evening — verify timestamps, resolution, and audio quality before you rely on the camera in a real incident.


About Chris Lewis
Chris Lewis developed a deep knowledge of automotive filtration, maintenance, and repair through years of hands-on experience working on vehicles — a passion rooted in time spent in his father's San Francisco auto shop from an early age. He has practical familiarity with air, oil, fuel, and cabin filter systems across a wide range of vehicle makes and models, along with experience evaluating the tools and equipment that serious DIY mechanics rely on. At MicrogreenFilter, he covers automotive and motorcycle filter reviews, maintenance guides, and automotive tool recommendations.
Get FREE Filters now. Or latest free tools from our best collections.
Disable Ad block to get all the secrets. Once done, hit any button below