Over 50 million minor automotive dents are repaired across the United States every year, yet crease dents — those sharp, linear depressions that cut across body panels — remain among the most frequently botched repairs attempted in home garages. Knowing how to fix a crease dent in a car correctly separates a smooth, professional-looking result from a rippled panel that ultimately needs a full respray. Our team at MicroGreenFilter has worked through dozens of these repairs firsthand, and we find that most people underestimate how methodical this process needs to be. For anyone working through DIY car maintenance projects, crease dent repair is one of the most rewarding skills to develop.

A crease forms when a rigid object — a parking barrier, another vehicle's door edge, or road debris — strikes a panel at an oblique angle, forcing metal to fold rather than simply compress. That fold creates a valley flanked by raised ridges on either side. Both sides must be addressed together. Push only the valley and the ridges stay high, leaving a visible ridge line even after the low point is corrected.
Our team breaks every crease repair into three phases: damage analysis, controlled metal movement, and surface verification. Each phase demands patience. Rushing any one of them is the fastest route to a body shop bill. Before diving in, it helps to have studied similar exterior repairs — fixing a keyed car shares the same fundamental principle of working with paint integrity while addressing underlying metal damage.
Contents
Essential Tools for Crease Dent Repair
No amount of technique compensates for the wrong tools. Our team finds that most failed home PDR attempts trace back to inadequate rod sets, mismatched tip profiles, or missing lighting equipment — not a lack of patience or skill. Here is exactly what a crease repair calls for.
PDR Rod Kits and Tip Selection
Paintless dent repair (PDR) rod kits come with interchangeable tips, and selecting the right tip for each phase of the repair is arguably the most critical technical decision in the entire process. According to Wikipedia's overview of paintless dent repair, the technique originated in the 1960s at Mercedes-Benz and has since evolved into a precision craft used by professionals and skilled home mechanics worldwide.
The three most-used tips for crease work are:
| Tip Type | Best Application | Material | Ideal Pressure |
|---|---|---|---|
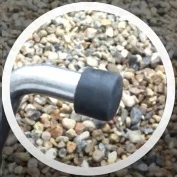
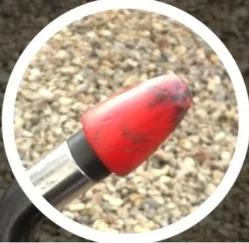
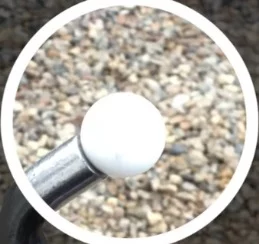
| Large Rubber Tip | Broad, shallow low points across the crease floor | Natural rubber | Light to medium |
| PVC Coated Bullet Tip | Narrow crease valleys and focused ridge-line work | PVC-coated steel | Medium to firm |
| Rounded Plastic Tip | Tight, hard-to-reach corners and final detail passes | Hard plastic | Light, highly precise |
Supporting Equipment
Beyond the rod kit, a complete crease repair toolkit includes:
- LED line board or dent light — reflects across the panel surface to reveal high and low spots invisible under ordinary ambient lighting; this is the single most important diagnostic tool in PDR
- Heat gun or infrared lamp — warms paint and metal to increase ductility before and during rod work
- Dry ice or cold spray — rapid cooling relaxes minor stress in some aluminum panels when applied immediately after heat
- Tap-down set — small knock-down tools for reducing raised ridges adjacent to the crease valley
- Plastic trim pry bar set — for removing door panels, fender liners, and wheel arch trim without cracking clip housings
- Foam blocks and wedges — protect interior trim surfaces when routing rods behind door skins

How to Fix a Crease Dent in a Car: The Complete Process
Our team follows a structured four-phase process for every crease repair. Combining phases or skipping steps is the primary reason home repairs fall short of professional results. Work methodically and the repair compounds on itself positively.
Phase 1: Damage Assessment
Every successful repair begins with a thorough reading of the metal. Our team positions an LED line board at a 45-degree angle to the affected panel and reads the reflection lines carefully before touching anything.

A typical crease on a door panel breaks down into distinct zones that each require a different repair approach:
- Section A — the leading edge of the crease, usually the shallowest point and the best place to begin rod work
- Section B — a raised bulge with a prominent crown sitting adjacent to the crease valley, created when impact energy pushed surrounding metal outward
- Section C — the deepest point of the crease, sometimes involving a bent panel profile or deformed wheel arch edge


Our team maps every zone before touching the metal. Knowing exactly where Section C sits prevents over-working the shallower zones while still under-addressing the deepest damage — the most common error in crease repair sequencing.
Phase 2: Accessing the Metal
Crease dents on door panels require partial disassembly to reach the inner side of the door skin. Our team removes the interior door panel carefully using plastic trim tools to avoid cracking clip housings. On fender and quarter-panel creases, the wheel liner typically needs to come out first.
Our team routes PDR rods through access holes created by factory wiring grommets or drain plugs whenever possible, which preserves the liner in better condition. The goal at this phase is to position the rod tip directly below the deepest point of the crease before applying any upward force. Mispositioning the rod — even a centimeter off — results in pushing a new lump next to the original damage. Unaddressed panel deformation can also affect door function; fixing a car door that won't close properly often traces back to exactly this kind of structural panel deformation left unrepaired.
Phase 3: Working the Crease
Our team starts at the shallowest end of the crease (Section A) and works progressively toward the deepest point. The rounded plastic tip leads this phase, using the LED line board to read every millimeter of metal movement.

Once the shallow zones are mostly level, our team switches to the PVC coated bullet tip for the deeper valley work in Sections B and C.

Our team works in small, overlapping passes — targeting 2–3 mm increments of forward progress per pass rather than attempting to restore full crease depth in one movement. This incremental approach gives metal time to settle between passes and prevents stress marks from forming in surrounding areas. The LED line board gets checked after every pass without exception.
Phase 4: Final Tapping and Surface Verification
After the low areas are raised, the ridges flanking the original crease need to come down. The tap-down set handles this with very light strikes — the goal is reducing high spots without creating new lows beneath them.

Our team returns to the LED line board repeatedly during this phase. The final verification should show smooth, continuous reflection lines across the entire repair zone. Any kink in those reflection lines indicates a remaining high or low spot that needs another pass before the repair is considered complete.
DIY Paintless Dent Repair vs. Body Shop: An Honest Comparison
Our team values honest assessments over optimistic claims. Here is a direct comparison of both repair routes specifically for crease dents.
Advantages of the DIY Route
- Cost savings are substantial — professional PDR for a crease dent typically runs $150–$500 depending on size and panel location; a quality home PDR kit costs $60–$150 and serves indefinitely
- No paint damage — PDR at any skill level keeps the original factory paint intact, unlike body filler approaches that require sanding and repainting
- Skill compounds quickly — each repair makes the next one faster and more precise
- Same-day completion — no waiting for shop availability, scheduling delays, or leaving a vehicle off-site for two days
- Full transparency — the operator sees every step of the process rather than receiving a finished result from a third party
The cost gap between DIY and professional repair widens considerably when comparing multiple damage types across a vehicle's lifetime. Reviewing headliner replacement costs alongside body shop panel repair quotes quickly demonstrates how much a working knowledge of home repair saves over time.
Where Professional Shops Have the Edge
- Access to specialized equipment including glue-pull systems and suction rigs for areas where rod access is physically impossible
- Years of panel-reading experience — a trained PDR technician reads metal movement faster and more accurately than most home practitioners
- Guaranteed results — reputable shops warranty their PDR work
- Complex panel profiles — creases running across body lines or sharp character lines require professional blending equipment to restore cleanly
Our team recommends DIY repair only when the crease is accessible, the paint is undamaged, and the deformation does not involve structural metal. More severe body damage — such as repairing bullet holes in a car — requires professional bodywork regardless of skill level or tool quality.
When Paintless Dent Repair Works — and When It Doesn't
PDR is not a universal solution, and knowing its hard limits prevents wasted effort and avoids making existing damage worse.
Ideal Candidates for PDR
Our team finds PDR most effective when all of the following conditions are met:
- Paint is completely intact — no cracking, chipping, or crazing visible in or around the damaged area
- Metal has not been creased past its elastic limit — the panel springs back noticeably when pressed lightly near the damage
- Rod access is available — rods can reach the back of the damaged skin through existing openings or with minor panel removal
- The crease is a single linear event — not a multi-directional collision deformation with overlapping zones
- The vehicle is less than 15 years old — older steel becomes less ductile and resists PDR manipulation more aggressively
- The crease does not run directly across a sharp pressed body line, which acts as a natural hinge point that resists straightening
Damage That Goes Beyond PDR
Some crease dents fall clearly outside what PDR can realistically address, even in professional hands:
- Creases with paint cracking along the fold line — body filler, primer, and respray become necessary regardless of how well the metal is restored
- Damage involving structural reinforcement panels or door intrusion beams beneath the skin
- Creases at or across sharp body lines — these require professional blending equipment to restore the surrounding surface
- Multiple overlapping impact zones from a collision event
- Wheel arch profile damage where the flange itself has been bent outward, as seen in Section C damage scenarios
Our team's firm rule: if a crease shows any paint damage whatsoever along the fold line, plan for a two-stage repair — PDR first to restore metal shape, then a spot repaint. Attempting to hide paint damage with wax or polish over an unrepaired crease never produces a satisfactory result under direct light.
This principle of addressing structural damage before cosmetic repair applies across multiple categories. Fixing cigarette burns in car interiors follows the same logic — the substrate damage comes first, cosmetic restoration follows.
Mistakes That Make Crease Dent Repairs Worse
Our team has documented — and made — every error on this list. These are the mistakes that consistently turn a manageable home repair into an unavoidable body shop visit.
Applying Excessive Force Too Early
The natural instinct when working a deep crease is to push hard toward the lowest point immediately. This creates several compounding problems:
- Overshoot — pushing metal past the correct height leaves a new high spot that is significantly harder to correct than the original low was
- Stress marks — visible surface stress in the paint from metal being forced rather than guided; these are often permanent without repainting
- Adjacent lows — excess focal pressure displaces metal outward, creating ring-shaped low areas around the repair zone that require additional correction passes
Our team applies a maximum-pressure rule: if the LED board shows the metal moving more than expected per pass, pressure gets reduced by 30–40% immediately. Slow, controlled movement produces better results than aggressive pushing in every scenario our team has tested.
Skipping Access and Heat Preparation
Two preparation steps get skipped more than any others, both with costly consequences:
- Skipping proper panel access — attempting to work a crease through an inadequate opening means constant rod repositioning, misaligned pressure points, and inconsistent metal movement. Taking an extra 20 minutes to fully remove a door panel saves multiple hours of corrective work afterward. Our team never attempts PDR through a partially opened access gap.
- Skipping heat application — cold metal resists manipulation significantly. A 2–3 minute warm-up with a heat gun held at 12–18 inches distance increases metal compliance measurably, especially in temperatures below 15°C (60°F). Our team applies heat before every work session and before each new phase of metal movement.
Poor access management is also the leading cause of secondary damage discovered during repair — trim clips snap, interior panel surfaces crack, and paint edges chip when tools are forced through openings that are too small. Working clean from the beginning keeps the repair scope from expanding unexpectedly.
Frequently Asked Questions
Can most people fix a crease dent at home without professional experience?
Most people with patience, a quality PDR rod kit, and an LED line board can achieve acceptable results on shallow, accessible crease dents. Deeper creases involving bent panel profiles or creases across sharp body lines are better left to experienced PDR technicians. Our team recommends starting on a less visible panel — such as a rear door — before attempting repairs on highly visible surfaces.
How long does a crease dent repair take using PDR?
Our team typically allocates 2–4 hours for a complete crease repair, including panel removal, rod work, and reassembly. Larger or deeper creases running across multiple damage zones can extend the process to 6–8 hours. Rushing this timeline is the single most common cause of incomplete or worsened repairs.
Does paintless dent repair work on aluminum body panels?
PDR works on aluminum, but aluminum work-hardens faster than steel — meaning repeated passes in the same area permanently stiffen the metal. Our team recommends fewer, more deliberate passes on aluminum panels and more thorough heat preparation before each pass. Excessive force on aluminum causes irreversible work hardening that cannot be corrected without repainting.
What separates a crease dent from a standard round dent?
A standard round dent compresses metal inward from a perpendicular impact, creating a smooth bowl shape. A crease dent forms from an oblique or linear impact that folds the metal along a line, creating a valley flanked by raised ridges on either side. Crease dents demand more technical skill because both the valley and the ridges must be worked simultaneously to achieve a flat result.
Will a well-repaired crease dent affect resale value?
A properly executed PDR repair restores the panel to near-factory condition without touching the original paint, which has negligible impact on resale value. A poorly executed repair — showing visible ripples, stress marks, or paint damage — can actually lower resale value more than the original unrepaired dent. Our team recommends professional pre-sale inspection whenever repair quality is uncertain.
How does heat application improve the PDR process?
Heat increases metal ductility, making panels more responsive to rod manipulation. Our team warms panels to roughly 40–50°C (104–122°F) surface temperature before beginning rod work. This reduces the force required to move metal, which directly reduces the risk of stress marks, overshooting the correct panel height, and creating adjacent low spots from excessive localized pressure.
When does a crease dent repair need to include repainting?
Repainting becomes necessary whenever the crease shows paint cracking along the fold line, surface crazing, or any chipping in the damage zone. Our team evaluates paint condition under direct lighting before any PDR work begins. If the paint shows structural failure — even hairline cracking — the complete repair plan should include spot repainting after the metal restoration is finished.
Next Steps
- Inspect the crease under an LED line board in a controlled light environment — confirm the paint is fully intact and the damage falls within PDR range before purchasing any tools.
- Source a complete PDR rod kit with at least three tip profiles (large rubber, PVC bullet, rounded plastic) plus a tap-down set and a heat gun.
- Practice pressure control on a spare panel or an inconspicuous location first — calibrating feel for metal movement is essential before working on the primary damage zone.
- Follow the four-phase process in strict order — assessment, access, metal movement, surface verification — without combining or skipping any step.
- Evaluate the finished repair under direct lighting at multiple angles and distances before reassembling panels or considering the job complete.


About Chris Lewis
Chris Lewis developed a deep knowledge of automotive filtration, maintenance, and repair through years of hands-on experience working on vehicles — a passion rooted in time spent in his father's San Francisco auto shop from an early age. He has practical familiarity with air, oil, fuel, and cabin filter systems across a wide range of vehicle makes and models, along with experience evaluating the tools and equipment that serious DIY mechanics rely on. At MicrogreenFilter, he covers automotive and motorcycle filter reviews, maintenance guides, and automotive tool recommendations.
Get FREE Filters now. Or latest free tools from our best collections.
Disable Ad block to get all the secrets. Once done, hit any button below