Ever climbed into your car on a sweltering afternoon only to discover the AC is blowing lukewarm air? If that's happened to you, there's a good chance you're dealing with a refrigerant leak — and knowing how to fix AC leak in car systems can save you real money. The problem is more common than most drivers realize, and it doesn't always require an expensive dealership visit. Whether you're a hands-on DIYer or just trying to understand your options before calling a mechanic, this guide covers diagnosis, repair methods, and prevention strategies. If you enjoy tackling car problems on your own, check out our DIY maintenance guides for more step-by-step walkthroughs.
Your car's AC system is a closed loop. Refrigerant circulates through the compressor, condenser, expansion valve, and evaporator without ever being "used up" — so if your system is low on refrigerant, it's leaking somewhere. The leak could be a tiny crack in a hose, a worn O-ring, a corroded fitting, or a damaged evaporator coil. The challenge is finding it. Once you do, your repair options become much clearer.
This isn't a one-size-fits-all situation. Some leaks are minor and easy to address at home. Others require professional equipment and specific refrigerant handling certifications. Understanding the difference is the first step toward making a smart, informed decision for your vehicle.
Contents
- Clearing Up the Most Common AC Leak Myths
- How to Fix AC Leak in Car: Start with a Proper Diagnosis
- Comparing the Most Common AC Leak Repair Methods
- When You Can Fix It Yourself — and When You Shouldn't
- Real-World AC Leak Scenarios and What They Cost
- Keeping Your AC System Leak-Free for the Long Haul
- The Right Tools for Every AC Leak Situation
- Frequently Asked Questions
- Final Thoughts
Clearing Up the Most Common AC Leak Myths
Before you start diagnosing anything, it helps to separate fact from fiction. There are a handful of persistent myths about car AC leaks that lead drivers to spend money they don't need to spend — or skip repairs they absolutely should make.
The biggest myth? That your AC refrigerant needs to be "topped off" regularly. It doesn't. Unlike engine oil or coolant, refrigerant in a healthy system stays at the same level indefinitely. If a technician tells you it needs periodic refilling without first diagnosing a leak, that's a red flag. You're treating a symptom, not the cause — and you'll be back in the same chair six months later.
Another common misconception is that water dripping under your car signals a refrigerant leak. That water is actually condensation from the evaporator — completely normal, especially in humid weather. A true refrigerant leak is invisible to the naked eye in its gas form. You'd need a UV light or electronic detector to confirm it.
Finally, many drivers assume AC leaks are always obvious and fast. In reality, small leaks can take months or years to deplete a system enough to affect performance noticeably. That's why proactive diagnosis matters far more than waiting until your AC stops working entirely. By then, a simple O-ring replacement may have turned into a compressor repair.
How to Fix AC Leak in Car: Start with a Proper Diagnosis
Guessing and replacing parts at random is expensive and often ineffective. Before any repair makes sense, you need to know where the leak is actually coming from. Here are the three most reliable diagnostic methods, in order of complexity.
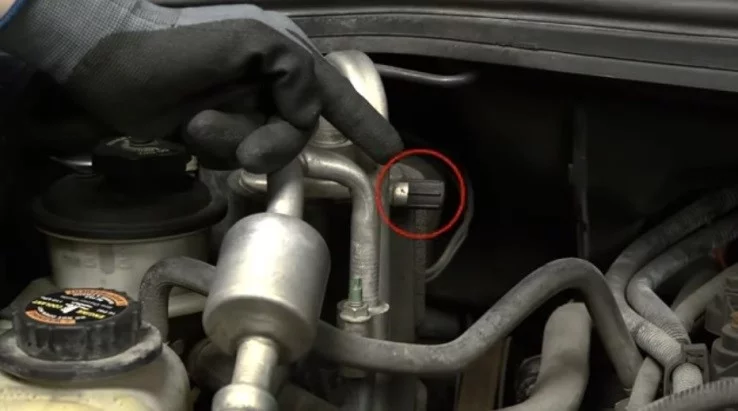
Visual Inspection First
Start with what you can see. Pop the hood and examine the AC components — the compressor, hoses, fittings, and the condenser (usually positioned directly in front of the radiator). Look for oily residue or discoloration around connections. Refrigerant oil travels with refrigerant gas and leaves a greasy, sometimes darkened film wherever it escapes.
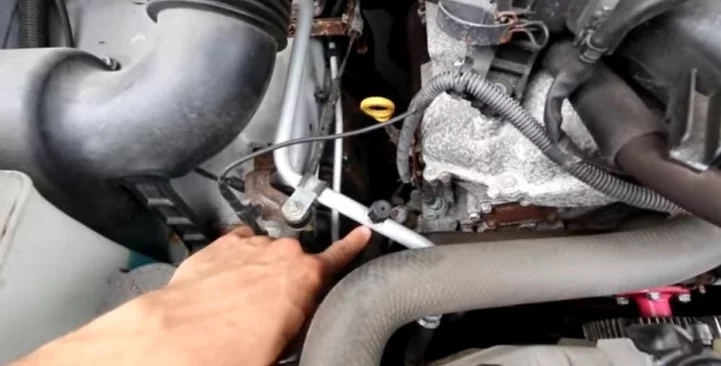
Pay close attention to hose fittings, Schrader valves (the same type used in tire valves), and the compressor shaft seal. These are the most frequent failure points. If you find oily buildup near any of them, you've likely found your leak source — or at least narrowed it down significantly.
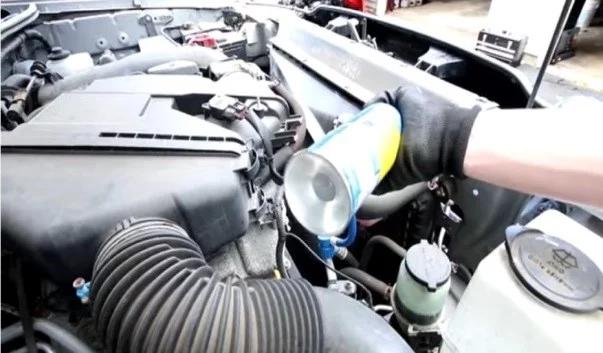
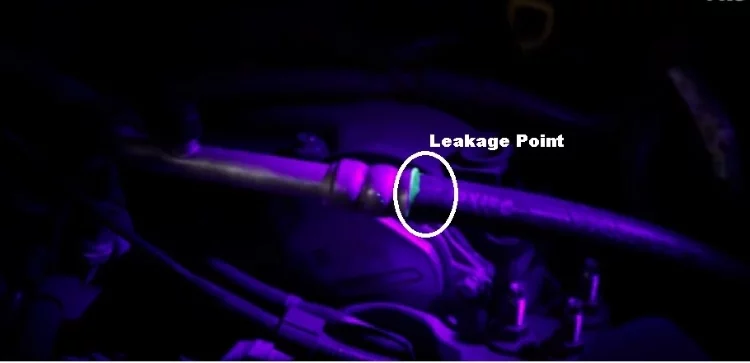
The UV Dye Method
UV dye kits are inexpensive and highly effective. You inject a small amount of fluorescent dye into the AC system through the low-pressure port, run the AC for several minutes to circulate it, then scan the system with a UV flashlight. Wherever refrigerant is escaping, the dye glows bright green or yellow.
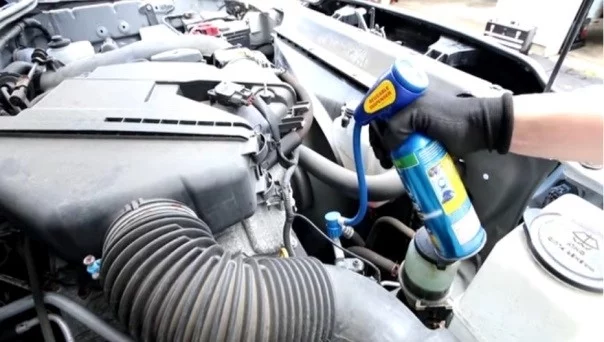
This method works especially well for slow leaks that a visual inspection misses entirely. Many professional mechanics add UV dye as a matter of course during any AC service, so future leaks are easier and faster to locate the next time around.
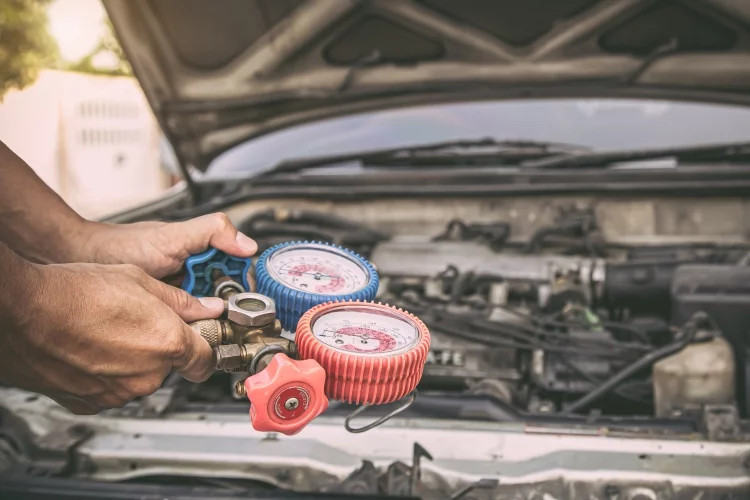
Using an Electronic Leak Detector
An electronic refrigerant leak detector is the tool professionals rely on most. You move the sensor probe slowly around AC components, and the device beeps or flashes when it detects refrigerant vapor. These detectors can identify leaks that UV dye misses — particularly slow evaporator leaks, which are buried behind the dashboard and nearly impossible to visually inspect.
Quality detectors are available for around $50–$150 at auto parts stores. According to Wikipedia's overview of refrigerants, most modern vehicles use R-134a or the newer R-1234yf — and each type requires a compatible detector for accurate readings. If your car was built after 2021, confirm which refrigerant your system uses before buying a detector.
Comparing the Most Common AC Leak Repair Methods
Once you've located the leak, you have several paths forward. The right approach depends on the leak's location, its severity, and your comfort level with automotive work. Here's how the main options stack up.
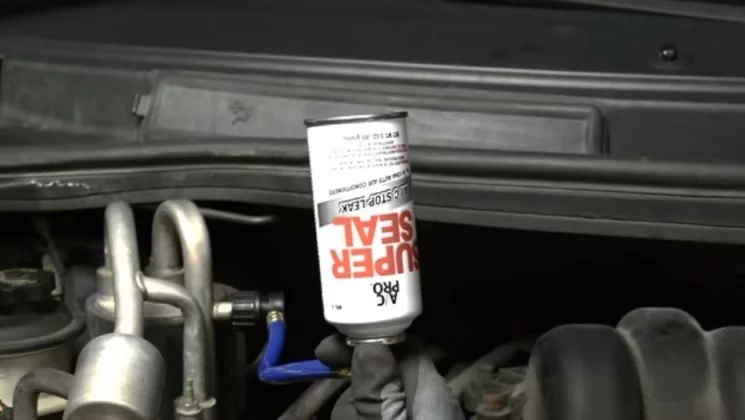
Sealant Products
AC leak sealants — sometimes called "stop leak" products — are widely available and marketed as a quick fix. You add them through the low-pressure port along with refrigerant, and they're designed to swell or solidify O-rings and seal minor leaks. They work best on very small leaks at O-ring connections.
Pro tip: Avoid AC sealants if your system has a known crack in a metal component — they're formulated for O-ring and hose-fitting leaks, not structural damage, and using them in the wrong situation can contaminate professional recovery equipment at a shop.
Component Replacement
For anything beyond a minor O-ring leak, component replacement is the more durable and reliable solution. This might mean replacing a hose, a fitting, the compressor shaft seal, or in more serious cases, the condenser or evaporator. These repairs typically require evacuating and recharging the system — which legally requires EPA Section 608 certification for handling refrigerant in bulk quantities.
| Repair Method | Best For | Approx. Cost | DIY Friendly? |
|---|---|---|---|
| AC Sealant (stop leak) | Tiny O-ring or hose leaks | $15–$40 | Yes |
| O-ring / fitting replacement | Visible leaks at connections | $50–$150 | Yes (with recharge kit) |
| Hose replacement | Cracked or worn AC hoses | $100–$300 | Moderate |
| Condenser replacement | Road damage or corrosion | $300–$700 | Difficult |
| Evaporator replacement | Interior leaks behind dashboard | $600–$1,200+ | No — professional only |
| Compressor seal replacement | Shaft seal failure | $150–$400 | Moderate |
When You Can Fix It Yourself — and When You Shouldn't
There's a clear line between what a motivated home mechanic can handle and what genuinely requires professional equipment and certification. Knowing where that line is saves time, money, and frustration.
Good Candidates for DIY
If the leak is at an accessible fitting, an O-ring, or a hose clamp — and you're comfortable using a refrigerant recharge kit — you can likely handle it yourself. Adding UV dye, performing a visual scan, and topping off refrigerant via a consumer recharge kit are all reasonable home repairs. Most auto parts stores carry everything you need for this type of basic AC service, often in a bundled kit for under $60.
Just as regular filter changes keep other systems running well — our guide on how often to change your cabin air filter is a good example — staying ahead of small AC maintenance tasks prevents minor issues from escalating into expensive repairs down the road.
When to Call a Professional
If the leak is at the evaporator (inside the dashboard), involves compressor internals, or requires full system evacuation and recharge with certified equipment, it's time to call a shop. Releasing refrigerant into the atmosphere is prohibited under EPA regulations, and handling it improperly can be harmful to both you and the environment. An evaporator replacement, for instance, typically involves removing the entire dashboard — a job that can run 6–10 labor hours at a dealership.
Consider pairing any AC repair with other overdue maintenance while the car is in the shop. For instance, reviewing how often you should change your car air filter is a useful reminder that several systems benefit from attention at the same time — and bundling service visits often reduces overall cost.
Real-World AC Leak Scenarios and What They Cost
Let's walk through a few typical situations drivers encounter. These aren't hypothetical — they're the kinds of cases that show up at shops every summer, and understanding them helps you set realistic expectations before you open the hood or call a mechanic.
Scenario 1: Gradual cooling loss over a few months. The AC works fine in spring but barely cools by midsummer. This is a classic slow leak, usually at an O-ring or hose fitting. A UV dye test or electronic scan locates it quickly. Cost to fix: $50–$150 for the fitting or O-ring, plus refrigerant recharge.
Scenario 2: AC stops working suddenly after a road trip. A stone or road debris can crack or puncture the condenser, which sits right behind the front grille and takes the brunt of highway debris. Refrigerant escapes rapidly. This typically requires condenser replacement — around $300–$700 parts and labor — but it's a relatively straightforward repair for a shop with proper equipment.
Scenario 3: Musty smell, weak cooling, and no visible leak. When symptoms point inward, the evaporator is often the culprit. It's tucked behind the dashboard and impossible to visually inspect without partial disassembly. An electronic detector can confirm the leak, but repair costs here are significant — $600 to over $1,200 — purely because of the labor involved in accessing it.
In each scenario, the repair path is clearer once you've accurately identified the leak location. Skipping diagnosis and simply recharging with refrigerant is a temporary fix at best — the system will leak down again, and you'll repeat the cycle indefinitely.
Keeping Your AC System Leak-Free for the Long Haul
Once you've addressed the immediate leak, your goal shifts to keeping it from recurring. AC systems are durable, but they're not maintenance-free. A few consistent habits go a long way toward extending the life of your components.
Routine Checks That Make a Difference
Run your AC for at least ten minutes every few weeks, even during cooler months. This keeps the compressor seals lubricated and prevents rubber components from drying out and cracking. It also cycles refrigerant oil through the system, which reduces wear on moving parts over time. Most drivers skip this step entirely in winter, and their seals pay the price by spring.
Have the system pressure-checked annually if you use the AC heavily. A certified technician can do this quickly during any routine service visit. Catching a slow leak early — when the system is only slightly low — is far less expensive than waiting until cooling performance degrades to the point where you notice it on a hot day. Early detection is the most cost-effective form of AC leak prevention.
Inspect visible hoses and fittings yourself whenever you change your oil or perform any underhood maintenance. Look for oily residue, cracking, or swelling in rubber hoses. Most AC hoses are accessible under the hood and take only a minute to eyeball. It's a simple habit that can flag problems months before they become serious.
The Right Tools for Every AC Leak Situation
Having the right tools on hand makes the difference between a confident repair and a frustrating guessing game. What's worth owning depends on how hands-on you want to be with your vehicle's AC system.
For basic diagnosis and topping off, a DIY refrigerant recharge kit with a built-in pressure gauge is a solid starting point. Most are designed for R-134a systems and include enough refrigerant to bring a moderately low system back to proper operating pressure. They connect to the low-pressure service port and are designed to be used without any special training.
A UV dye kit paired with a blacklight flashlight is the next logical addition. Full kits — including dye, the injection tool, and the light — are typically available for under $30. If you own multiple vehicles or expect to use it more than once, this setup pays for itself quickly. It's also useful for confirming a repair was successful after replacing an O-ring or fitting.
For more thorough diagnostics, an electronic refrigerant leak detector is the professional's choice. It can identify leaks that UV dye misses, particularly in hard-to-access areas like the evaporator. Some models are compatible with both R-134a and R-1234yf, which is worth considering if you have a newer vehicle or plan to service multiple cars.
Finally, if you're replacing O-rings or fittings, a vehicle-specific O-ring kit is essential. These are inexpensive — often $10–$20 — and having a full set on hand means you won't be stuck mid-repair waiting on a parts store run for one missing seal.
Frequently Asked Questions
Can I drive my car if the AC is leaking refrigerant?
Yes, a refrigerant leak won't prevent your car from being driven. However, running the AC compressor with very low refrigerant can damage the compressor over time, since the refrigerant also carries the lubrication oil that keeps the compressor healthy. It's best to either stop running the AC or get the leak addressed promptly to avoid a more expensive repair down the line.
How do I know if my AC is leaking refrigerant or just low?
If the system is low, it's leaking — refrigerant doesn't deplete on its own in a healthy, sealed system. Common symptoms include reduced cooling performance, the compressor cycling on and off rapidly, or the compressor clutch not engaging at all. A UV dye test or electronic detector will confirm the leak and help pinpoint its location.
Is it safe to use AC stop leak products?
AC sealants can be effective for very minor leaks at O-rings and hose fittings, but they carry real risks. Some formulas can contaminate professional refrigerant recovery equipment, which may result in shops refusing service on your system afterward. If you use one, choose a product clearly labeled as "technician safe" and follow the dosage instructions carefully.
How much does it cost to fix an AC refrigerant leak?
Costs vary significantly depending on the leak's location. Simple O-ring or fitting repairs might cost $50–$150 as a DIY job or $150–$300 at a shop including recharge. Evaporator replacement can exceed $1,200 due to the labor involved in accessing it. Getting an accurate diagnosis before committing to a repair path is essential — you need to know what you're actually dealing with.
How long does an AC recharge last after fixing a leak?
If the underlying leak is properly repaired, a recharge should last years — essentially the life of the repaired component. If your system needs frequent recharging every season, the leak has not been fixed. Recharging without addressing the source is a temporary and ultimately costly cycle that masks the real problem.
Can a car AC develop leaks without any damage or impact?
Yes. Normal aging causes rubber O-rings and hose seals to harden, shrink, and crack over time, leading to slow leaks even without road damage or physical impact. Vehicles older than eight to ten years are especially susceptible to this type of age-related seepage, particularly at the compressor shaft seal and line fittings.
Do I need a certification to recharge my own car's AC?
For topping off using a consumer recharge kit — the sealed cans sold at auto parts stores — no certification is required. However, purchasing refrigerant in bulk quantities or using professional recovery and recharge equipment requires EPA Section 608 certification under federal law. Any repair that requires full system evacuation, such as evaporator or compressor work, should be performed by a certified technician.
Final Thoughts
Knowing how to fix AC leak in car systems puts you in control of your comfort, your repair costs, and the long-term health of your vehicle. The most important step you can take right now is a proper diagnosis — grab a UV dye kit or borrow an electronic detector from your local auto parts store, locate the leak, and then decide whether it's a DIY fix or a shop job. Don't let a small, inexpensive leak sit until it becomes a costly compressor or evaporator repair. Head over to our DIY maintenance section for more practical guides that help you handle car repairs with confidence.


About Chris Lewis
Chris Lewis developed a deep knowledge of automotive filtration, maintenance, and repair through years of hands-on experience working on vehicles — a passion rooted in time spent in his father's San Francisco auto shop from an early age. He has practical familiarity with air, oil, fuel, and cabin filter systems across a wide range of vehicle makes and models, along with experience evaluating the tools and equipment that serious DIY mechanics rely on. At MicrogreenFilter, he covers automotive and motorcycle filter reviews, maintenance guides, and automotive tool recommendations.
Get FREE Filters now. Or latest free tools from our best collections.
Disable Ad block to get all the secrets. Once done, hit any button below