Every year, over 4,800 people visit emergency rooms due to injuries from cars falling off improper supports. If you've ever wondered how to put car on jack stands safely, you're asking the right question. Whether you're doing an oil change, swapping brake pads, or inspecting your suspension, getting all four corners of your vehicle supported correctly is one of the most important automotive skills you can learn. The process isn't complicated, but skipping steps or cutting corners can turn a routine job into a life-threatening situation.
The good news is that with the right equipment and a methodical approach, you can have your car safely elevated on four jack stands in under 20 minutes. This guide walks you through everything from choosing the right gear to avoiding the mistakes that catch even experienced DIY mechanics off guard.
Before you slide under your vehicle, take a few minutes to understand the process fully. A calm, deliberate approach beats rushing every single time. Let's break it down step by step.
Contents
- How to Put Car on Jack Stands Safely
- When You Need All Four Stands (and When You Don't)
- Equipment Costs and What's Worth the Money
- Jack Stand Myths That Put You at Risk
- Troubleshooting Unstable or Uneven Support
- Maintaining Your Jack Stands for Years of Safe Use
- Mistakes That Send Cars Crashing Down
- Frequently Asked Questions
- Next Steps
How to Put Car on Jack Stands Safely
Learning how to put car on jack stands properly comes down to following a specific sequence. You lift one end, place the stands, then repeat on the other end. Sounds simple enough, but each stage has details that matter. Here's the full process from start to finish.
Prepare Your Vehicle and Workspace
Park on a flat, hard surface like concrete or asphalt. Gravel, grass, and dirt are not safe options. Put the car in park (or first gear for a manual), engage the parking brake, and turn off the engine. Place wheel chocks behind the tires that will stay on the ground first — when lifting the front, chock the rear wheels, and vice versa.
Gather your equipment before you start. You'll need a floor jack rated for your vehicle's weight, four jack stands rated for at least 75% of your car's total weight (each stand), wheel chocks, and optionally a torque wrench if you're removing wheels. Check your owner's manual for the designated jack points and support points specific to your vehicle. These are reinforced areas of the frame or unibody designed to handle the load. Using the wrong points can bend sheet metal or crack plastic undercarriage panels.
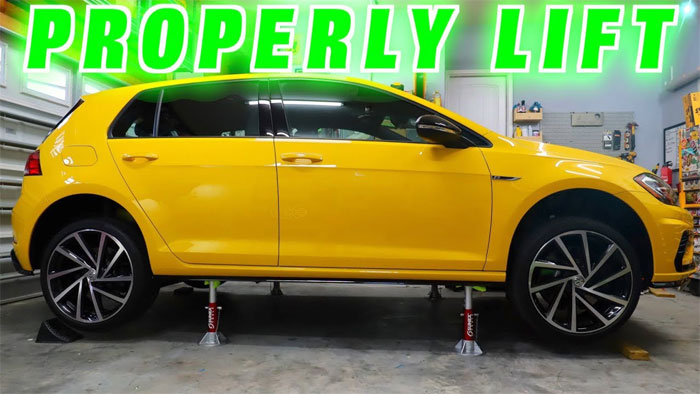
Lift and Support the Front End
Position your floor jack under the front jack point. On most unibody cars, this is a reinforced crossmember or subframe bolt. On trucks and body-on-frame vehicles, it's typically the frame rail itself. Pump the jack slowly until the front tires clear the ground by about two inches.
Now slide your jack stands under the designated support points — usually the pinch welds (the seam running along the bottom of the rocker panels) or the frame rails. Adjust them to the correct height so the saddle contacts the support point firmly. Lower the floor jack slowly until the vehicle's weight transfers onto the stands. Give the car a firm push from the side. If it rocks, something isn't seated correctly — raise it again and reposition.
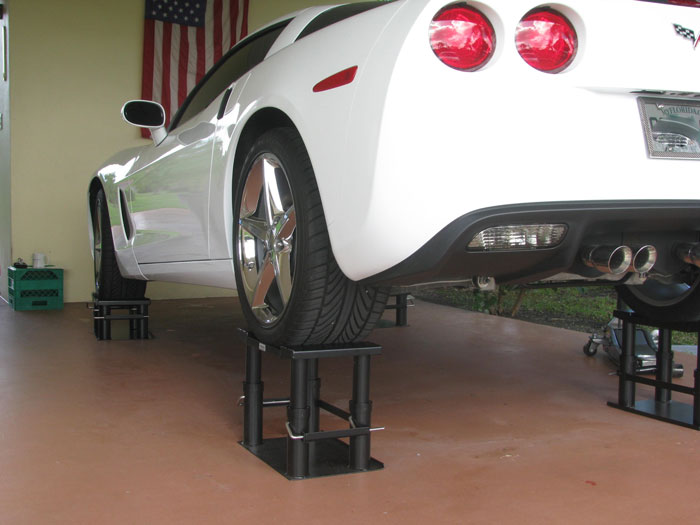
Lift and Support the Rear End
Move your wheel chocks to the front tires now that the front is supported. Position the floor jack under the rear jack point — typically the differential housing on rear-wheel-drive vehicles, or a rear subframe crossmember on front-wheel-drive cars. Lift until the rear tires clear the ground.
Place the rear jack stands under the rear support points and lower the jack carefully. Once all four stands bear the load, remove the floor jack entirely — don't leave it as a "backup" support, because hydraulic jacks can and do fail over time. Give the whole car another shake test. It should feel absolutely solid with zero movement.
When You Need All Four Stands (and When You Don't)
Not every job requires lifting the entire car. Understanding when to use all four stands versus just two saves time and reduces unnecessary risk. You need all four stands when you're working on exhaust systems, replacing suspension components on both sides, doing full brake jobs across all four corners, or performing extensive undercarriage inspections.
Two stands are enough for most single-end tasks. Changing front brake pads, rotating tires two at a time, or doing an oil change typically only requires lifting one end. If you're just changing an oil filter, you might only need the front up. The general rule: if your work only touches components at one end of the car, two stands will do. If you need access to the full underside or are removing multiple wheels simultaneously, go with all four.
There are also situations where jack stands aren't appropriate at all. If you need to have the wheels hanging at full droop for suspension work, you'll want a proper lift. And if you're on anything other than a solid, level surface, consider whether the job can wait until you have access to a better workspace.
Equipment Costs and What's Worth the Money
You don't need to spend a fortune on jack stands, but buying the cheapest option at a discount store isn't wise either. Here's what you can expect to spend on a proper setup for lifting your car on all four corners.
| Equipment | Budget Option | Mid-Range | Premium |
|---|---|---|---|
| Jack Stands (pair) | $30–$45 | $60–$90 | $120–$200 |
| Floor Jack (2–3 ton) | $40–$60 | $80–$150 | $200–$400 |
| Wheel Chocks (pair) | $10–$15 | $20–$30 | $35–$50 |
| Pinch Weld Adapters | $10–$15 | $20–$30 | N/A |
| Total (4-stand setup) | $120–$180 | $220–$390 | $475–$850 |
The sweet spot for most DIY mechanics is the mid-range category. You'll get ratcheting stands with wider bases, a low-profile jack that fits under modern cars, and rubber-coated saddles that protect your pinch welds. Never buy used jack stands — you can't verify whether they've been overloaded, dropped, or have invisible stress cracks in the welds.
If your vehicle is a sedan or compact car, 2-ton stands are sufficient. Trucks, SUVs, and anything over 4,500 pounds gross vehicle weight need 3-ton stands minimum. Always check the rating stamped into the stand itself, not just the box it came in.
Jack Stand Myths That Put You at Risk
There's a lot of bad information floating around forums and social media about how to put car on jack stands. Let's clear up the most dangerous misconceptions.
"Cinder blocks work just as well." No. Concrete blocks are designed for compression loads in walls, not the shear forces and point loads from a vehicle. They crack without warning. The Occupational Safety and Health Administration specifically warns against using makeshift supports under vehicles.
"You can leave the floor jack in place as backup." While some mechanics do this, it creates a false sense of security. Hydraulic seals degrade, and jacks are designed for lifting — not long-term static support. If you want redundancy, place the removed wheels flat under the car's frame as a catch in case a stand fails.
"The car won't fall if you're quick." Physics doesn't care about your schedule. A 3,500-pound car dropping even six inches generates roughly 10,000 pounds of force at impact. That's more than enough to crush a ribcage. Never get under a car supported only by a jack, even for a "quick look."
"All four stands need to be at the same height." Not necessarily. What matters is that each stand is properly seated on its designated support point and locked at the correct height for that point. Front and rear support points are often at different heights relative to the ground, and that's perfectly fine.
Troubleshooting Unstable or Uneven Support
Sometimes you do everything right and the car still doesn't feel solid. Here's how to diagnose and fix the most common stability issues when you have your vehicle on four stands.
Dealing with Wobble
If the car wobbles on the stands, the most likely culprit is a stand that isn't fully seated on the support point. Lower the car back onto the jack, recheck your support point locations against your owner's manual, and look for paint marks or wear patterns from previous jacking. A stand that's even half an inch off from the proper location can create instability.
Another common cause is the ratchet mechanism not being fully locked. Many stands have a pin that drops into notches on the center post. If that pin isn't fully engaged — if it's resting between two notches — the stand can shift under load. Always verify the locking mechanism before transferring weight.
Stands Sinking into Soft Ground
Even concrete can have soft spots, especially in older garages. If a stand is sinking or tilting, place a flat steel plate (at least 12 inches square and half an inch thick) under the base. Plywood works in a pinch but can compress and split over time. The goal is to distribute the point load across a wider area.
If you're working on asphalt in hot weather, the surface can deform under concentrated weight. In those conditions, steel plates aren't optional — they're essential. Some mechanics keep a set of four 12×12-inch steel plates specifically for this purpose.
Maintaining Your Jack Stands for Years of Safe Use
Jack stands are simple tools, but they still need basic care to remain safe. After each use, wipe them down to remove grease and road grime. Store them in a dry location — rust weakens the metal over time, and a corroded ratchet mechanism might not lock properly.
Inspect your stands before every use. Look for cracks at the weld joints where the legs meet the center column, bent or warped legs, and wear on the ratchet teeth. If you notice any pitting, heavy rust, or deformation, replace the stands immediately. A $70 pair of stands is not worth risking your life over.
Most manufacturers don't specify a service life for jack stands, but a reasonable guideline is to replace them after 10 years of regular use, or sooner if they've been dropped from any height or subjected to a vehicle falling on them. Even if they look fine externally, the internal metal structure may have fatigue cracks that aren't visible.
If you're doing regular maintenance on your vehicle — oil changes, cabin air filter replacements, brake work — you'll use your stands often enough that quality equipment pays for itself quickly. Think of it as the cost of not paying shop labor rates for jobs you can do yourself.

Mistakes That Send Cars Crashing Down
Even people who understand how to put car on jack stands make errors when they get complacent or rush. Here are the mistakes that cause the most accidents, and they're all preventable.
Using the wrong jack points. Your car has specific reinforced locations for jacking and for stand placement — and they're not always the same spots. The jack point might be a center crossmember, while the stand points are on the pinch welds. Confusing these can mean placing a stand on sheet metal that will fold under load.
Skipping the shake test. After every stand placement, push the car firmly from the side and from the end. If there's any movement at all, it's not safe to get underneath. This five-second test is the simplest safety check that exists, and skipping it is pure negligence.
Working on an incline. Even a slight slope changes the load distribution on your stands. What felt stable on flat ground can shift on a 2-degree grade. If your garage floor has any tilt to it, always position the car so it would roll into the chocks, not away from them.
Lifting from one corner only. If you jack up just one corner and the car pivots off the opposite stand, you have a catastrophic failure. Always lift one complete end (front or rear) at a time when working toward a four-stand setup.
Not accounting for vehicle weight shift. When you remove heavy components like a transmission or fuel tank, the weight distribution changes. If you're doing a job that removes significant weight from one area, recheck stand stability periodically throughout the work.
Frequently Asked Questions
Can I put my car on jack stands on gravel or dirt?
You should avoid it whenever possible. Gravel shifts under load, and dirt can compress unevenly. If you have absolutely no other option, use large steel plates under each stand and the jack to create a stable base, but understand that this is still less safe than working on concrete.
How long can a car safely stay on jack stands?
Properly rated jack stands can support a car indefinitely as long as they're on a solid surface and the locking mechanism is fully engaged. Many mechanics leave project cars on stands for weeks or months without issues. Just inspect the stands periodically for any signs of settling or shifting.
Do I need four jack stands of the same brand?
They don't need to be the same brand, but they should all be the same weight rating and ideally the same height range. Mixing a 2-ton stand with 3-ton stands is fine from a capacity standpoint (the car is lighter than any single stand's rating), but different height ranges can make leveling difficult.
What's the difference between pin-type and ratchet-type jack stands?
Pin-type stands use a hole-and-pin system for height adjustment. They're simpler and some consider them safer since there's no mechanism to fail. Ratchet-type stands adjust height via a toothed bar and pawl. They're more convenient for quick height changes but require you to verify the pawl is fully engaged before loading.
Can I use a scissor jack to lift the car onto stands?
A scissor jack (the one that comes with your car) can technically lift the car, but it's slow, unstable, and not designed for repeated use. A hydraulic floor jack is much safer and faster for this purpose. Scissor jacks are emergency tire-change tools, not workshop equipment.
Where exactly are the jack stand support points on my car?
Support points vary by vehicle. Check your owner's manual for diagrams showing the exact locations. Generally, unibody cars use reinforced pinch weld sections behind the front wheels and ahead of the rear wheels. Trucks and body-on-frame vehicles use the frame rails directly. When in doubt, look for flat, reinforced metal surfaces designed to bear weight.
Is it safe to start the car while it's on jack stands?
You can start the engine on jack stands for diagnostic purposes, but never put the car in gear with the drive wheels off the ground unless you specifically need to observe wheel rotation for diagnosis. The spinning wheels can catch clothing or tools, and any vibration could potentially shift the vehicle on the stands.
Next Steps
- Check your owner's manual today and mark or photograph the exact jack points and jack stand support locations for your specific vehicle — this eliminates guesswork when you're actually under the car.
- Inspect any jack stands you currently own for rust, cracks, or worn ratchet teeth, and replace any that show signs of damage or are more than ten years old.
- If you don't already own a hydraulic floor jack and four matching stands, invest in a mid-range set (budget around $200–$300 total) before your next maintenance job.
- Practice the full lift-and-support sequence on a day when you don't actually need to work under the car — getting comfortable with the process when there's no pressure makes you safer when it counts.


About Chris Lewis
Chris Lewis developed a deep knowledge of automotive filtration, maintenance, and repair through years of hands-on experience working on vehicles — a passion rooted in time spent in his father's San Francisco auto shop from an early age. He has practical familiarity with air, oil, fuel, and cabin filter systems across a wide range of vehicle makes and models, along with experience evaluating the tools and equipment that serious DIY mechanics rely on. At MicrogreenFilter, he covers automotive and motorcycle filter reviews, maintenance guides, and automotive tool recommendations.
Get FREE Filters now. Or latest free tools from our best collections.
Disable Ad block to get all the secrets. Once done, hit any button below